
A couple years ago, I upgraded my ride and went with a full suspension 29 inch Specialized. I really like that bike. As I rolled it out of the bike shop, I asked the shop sales person how often I should do maintenance on the rear shock. I ended up getting a vague answer like – “Um, it depends.”
I thought it would have been super beneficial to have a MOUNTAIN BIKE MAINTENANCE SCHEDULE. So here it is. The stuff in italics are pro tips and hacks to make maintenance easier.

Before Every Ride
Some things you should do or check before each and every ride:
ESSENTIAL
If all you have is a minute, do a quick 4-point check:
- Lube chain
- Check tire pressure
- Test brakes
- Quick release skewers – open, adjust and tighten
If you have 5-15 minutes, do this every ride:
- Brake check – test for firmness and examine pad wear
- Tire pressure – inflate to your desired pressure
- Wheel spin – check for brake rub or bent rim
- Drivetrain test – shift through the gears, lube chain if needed
- Drop check – listen for strange sounds or loose components
- Suspension sag – check fork and shock settings, test bounce
- Check dropper post – test for smooth action and snappy return
- Tire surface check – look for rips or cracks
Check out this FREE Download of the ULTIMATE MAINTENANCE CHECKLIST (no emails required – just get it)

Side note: Nearly all of the above pre-ride check can be done after rides as well. I secretly prefer the post-ride approach since it gives me time to take care of any problems. Then I’m ready to roll out the door the next ride.
Squeeze the brakes
Cable Brakes – Do they engage firmly? Feel mushy? Check the brake pads for excessive wear. If the grooves are worn down flat, you should replace the pads.
Quick Fix – Firm up brakes with the barrel adjuster located where the brake cable exits the brake lever mechanism on the handle bar. Unscrewing the barrel increases cable tension to tighten the brakes. This is only good for minor adjustments. Sooner or later, you’ll have to adjust the cable length at the brake end.
Disc Brakes – If disc brakes feel too soft, the pads might be too thin. Look at the disc pads which are inside the caliper adjacent to the disc. You may have to remove the pads to get a good look. If pad thickness is less than a dime’s width, you may have to replace them. If the brakes are dramatically soft, you could have a brake fluid leak.

What Is A Folding Bike Tire (Is It Bad?)
Ever heard of a folding bike tire? Sounds pretty nifty, right? Usually, if you want…

Can A Bike Pump Inflate A Car Tire?
Maintaining proper car tire pressure is critical in improving how you drive your vehicle. Good…

The Skinny Tire Mountain Bike (Explained)
While most mountain bikes are designed for going off-road and aren’t designed for speed, some…

How To Ride a Bike on a Beach (And the Best Tires for It)
A fat bike is the best choice when you want to ride a bike on…

Here’s How MTB Tires Are Measured (With 2 Examples and Easy Tips)
It is good to know the tire size of your mountain bike. This way, you…

Can You Put Hybrid Tires on A Mountain Bike?
Changing the tires on your mountain bike to hybrid tires can be great if you…
Check Tire Pressure
Optimal tire pressure depends upon:
- Your weight
- Type of tire
- Terrain
- Weather (less pressure offers more traction in the wet)
- Personal preference
If you don’t have one, invest in a floor pump with a built in pressure gauge. It’s even better if you use a separate gauge.
After trying a half dozen different style gages I finally found one I recommend read about the TOPEAK D2 Smart Gage. (Link to article)

Rule of thumb: Start at 30 psi and try different pressures with each ride. Go up or down by increments of 3-5 psi.
Test Quick Release Skewers
These rods run straight through the wheel axle and keep your wheel in place. If they open very easily, tighten the bolt cap about half a turn. Close the lever. The tension should be firm enough to leave an impression on your hand. If it doesn’t feel tight enough, open the lever, tighten the cap another ¼ turn and close the lever again. Reverse the process if it’s too tight.
Wheel Spin
Lift the front wheel off the ground and give it a spin. Does the wheel spin freely or brush up against the brake pads? If it completely stops spinning due to brake rub, you need to have your wheel trued.
Drivetrain Check

Gear Shifting – If you have a repair stand, place your bike in it and cycle through all the gears while you rotate the cranks. Make sure you check both front and rear shifters. If you don’t have a stand, ride the bike and shift through the gears.
Quick fix – If you notice the chain hesitates or gets held up, you may need to tighten or loosen the barrel adjuster that exits from the rear derailleur. Later, you’ll need to adjust the cable length.
Chain – The ideal way to lube is by placing a single drop of lube on each link. If you don’t have time, place the lube nozzle on the chain and backpedal until the chain is moist. Wipe off excess lube with a shop rag. Some like to lube their chain during the post ride cleaning process.
Drop Check
Lift your bike about 8-10 inches off the ground and drop it (don’t let it fall over!). Listen for odd sounds and observe for abnormal component movement. If you learn what your bike sounds like normally, the drop test may alert you to new problems.
Fork and Shock Sag
Keep tabs on how deep your fork and rear shock (for dual-suspension bikes) compress when you sit on your bike. Also, your suspension settings and pressure should be checked with every or every other ride. Your component user manual or shop tech can guide you with settings and adjusting. After setting sag, rebound and pressure, ride around a bit and bounce on your bike. Get accustomed to the suspension’s feel so you can detect any changes.
Dropper Post
If you use a dropper post, make sure it collapses smoothly and rebounds quickly. It should not get hung up at all in either direction.
Tire Inspection
Check for any bulges, rips or cracks, especially in the side wall. Most modern day tires are very durable, but a sharp rock can easily cut into the tire.
MTB Tools I Love and Recommend
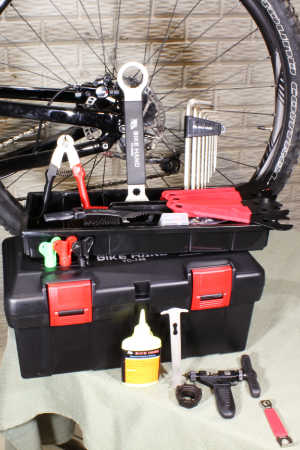

I own each of these tools and only recommend things I own and use.
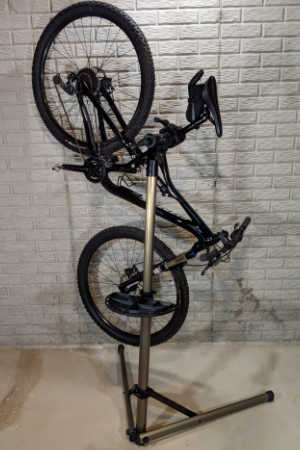
- Bike Hand Bike Repair Stand. Nice mountain bikes don’t have a kick stand so keeping your MTB safe but conveniently stored is essential. I keep my bike on my stand whenever I’m not riding it. This makes it easy to lube the chain, inflate the tires and adjust the derailleur. Highly recommended – Bike Hand Bike Repair Stand (👈 Link to Amazon to see what thousands of others have said)
- A basic MTB toolbox for replacing a chain, adjusting brakes and dialing in the fit. Bike Hand has a 37-piece box that has most of the specialty bike tools to keep your MTB properly maintained. The Bike Hand brand is value packed for the avid rider. Check out the competitive prices with this link to Amazon 👉 Bike Hand 37 pcs Bike Repair Tool Kit
- Get a good air pressure gauge, if you get just a tiny bit serious about MTBing you’re going to start playing with tire pressure. A couple psi can make your tires sticking or not. Get a good gauge, I highly recommend the Topeak Smartgauge D2, it’s accurate, flexible and easy to use. An Amazon best seller, here’s a link 👉 Topeak Smartgauge D2
- Carry a multitool with you on every ride. I’m serious, most of the time you can MacGyver something to get back to the trailhead if you have a multitool. I’ve got the Crank Brothers M19, it’s worn, rubbed and abused – but it still works. Thousands sold on Amazon – check it out with this link 👉 Crank Brothers M19
After Every Ride
The post ride maintenance includes:
- Bike wash and dry – immediately after riding is best
- Bolt check – tighten anything that’s loose
- Degrease – use a biodegradable degreaser
- Lubricate – chain, bushings, pulleys, pivot points
- Drop check – listen for any abnormal sounds
Wash Your Ride
If the ride was muddy, use low pressure water and a soft brush to wash off the grime. It’s much easier to wash your bike before the mud dries. Do not use a pressure washer as it might damage headset or suspension seals. Dry off your bike with a clean rag. Pay special attention to drying the chain as rust appears there first. If you had to use a lot of H2O, you may need to remove the seatpost and hang your bike upside down to drain and dry.
If your ride was dry, you might not want to use water. A soft brush or rag can get rid of any minor dust or dirt accumulation.
Lazy rider tip: Forgot to wash off the mud last night? For hardened, caked on dirt, knock off as much dry mud with your hands or brush handle first. Then rinse off what’s left over. This prevents driving dirt deeper into components.
Winter bike wash tip – If you ride during winter and they use salt on the roads in your area, wash off your bike right away after each ride. Salt kills components fast. Also, use warm water if possible. If not, the water can freeze onto your frame.
Let it Dry and Cassette Floss
Before moving onto deeper cleaning and lube, let the bike air dry thoroughly. You don’t have to waste time though, since you can do some other maintenance in the meantime. For instance, you can clean the rear cassette (gear group on the rear wheel) while air drying. The best way to do this is by taking the edge of a rag and “flossing” in between the sprockets (some call them “cogs”). You can do a similar cleaning job on the front chain rings.
Check Bolts
Use a multi-sized allen wrench and go over and tighten every bolt on the bike. Some like to start from top to bottom or tighten by component. Don’t overtighten! If it’s a smaller bolt, much less torque is needed. Make sure larger bolts are firmly tightened, especially bolts that secure the handlebar and brakes. Bolt check is best done after each ride because if there’s a problem, you have time to fix it.
Degreasing
This does not have to be done after every ride, but once every 2-3 rides is a good place to start. No matter how much water you use, chain lube stays stuck on bike components. Purchase a biodegradable degreasing agent at your local bike shop or auto-shop. I like to use a container with a spray nozzle. Spray each component with degreaser, let it soak, then clean with a rag and/or small brush.
Don’t overlook the rear derailleur pulleys. These can be hard to clean completely. I like to brush them off with and old toothbrush.
You can also purchase a special chain degreaser device. It’s like a plastic box with rotating brushes that you close around your chain. First you fill the device with degreaser, put it on your chain, then pedal backwards. This is a great way to get every nook and cranny of your chain free of grease and muck.
Once everything is degreased, rinse and wipe off excess degreaser with a clean rag.
Lubrication
When you go to lube your bike, start with the component you degreased first. This allows for other parts to dry in sequence. Here’s how I lube each part:
Chain – I take the time to place 1-2 drops on each chain link. This may seem like overkill, but excess lube only attracts grime. If you’re in a hurry, lay the lube nozzle against the chain and backpedal until the entire chain is moist. Then wipe off excess lube.
Derailleurs – Place a single drop of lube on each hinge, pulley bushing and seal.You may have to tilt your bike so the lube can penetrate better. Wipe off any excess. Shift through the gears to make sure the lubricant works its way through the entire mechanism. Some place a drop or two of lube onto the derailleur spring. It’s probably better to apply a bit of grease to the spring every several rides. Inspect the derailleur while lubricating. Look for any sign of misalignment or abnormal play in the mechanism.
Pivots – Depending on your bike design, you may have multiple pivot points. On dual suspension bikes you can place a drop or two onto these joints. You can also lightly lube your pedals at the rotation point.

Clipless Pedals – The binding mechanism can get stiff after a dirty ride. Make sure the springs and binding are clean, then apply a drop or two of lube to any spring mechanism. Clip in and out of the pedal to distribute the lube.
Cables – After wet rides, or every 3-5 rides, I like to lube the cables. You can do this by disengaging the brake cable at the brake arms. Then slide the cable housing to expose the cable. Place a few drops of lube on the cable, then wipe clean. Only a very thin film of lube is required to assist with cable function. For the derailleur cable, shift up to the largest sprockets to create tension in the cable. Then, shift down without pedaling. This will slacken the cable so you can remove the housing from the cable stops to access the shifter cable.
Caution! When lubing your bike, be careful not to get any oil on the rim or discs for disc brakes. This will eliminate brake grab and could cause a crash. If you do splash oil on a braking surface, wipe it off thoroughly with a clean dry rag and a bit of degreaser.
Every 5-15 rides
Some maintenance is more long term. Depending on the kind of weather you ride in, you should consider checking these items every 5-15 rides:
- Chain elongation – timely replacement is essential
- Brake pad inspection – When used, swap them out for best performance
- Wheel and rim check – make sure they are true, round and undamaged
- Fork and shock exam – check settings and look for abnormal movement
- Wiggle test – check components for abnormal side to side play or knocking
- Smooth test – detect if parts hesitate, grind or squeak
- Headset – check for any looseness
- Bottom bracket and cranks – adjust bolt tightness and inspect bracket
- Derailleur adjustment – make each shift crisp and defined
Check Chain Elongation
The bike chain is under tremendous pressure and over time it will stretch. This can lead to a malformation of the teeth in the rear cassette sprockets and chainring. The result is poor shifting and other chain problems. The distance between the center of one rivet and 23 rivets downstream should be exactly 12 inches. If it’s off by more than 1/16” then you should replace your chain.
Cheater’s method: I hate trying to measure my chain. Instead, I think of it like changing my the oil in my car. I slap on a new bike chain with the changes in season. Every spring, summer, winter and fall I replace my bike chain. Two to three times per year is probably okay too. Just don’t forget!
Inspect Brake Pads
For rim brakes, the pads have grooves in them. When these grooves disappear, it’s time to change the pads. Disc brakes pads should be have at least a dime’s width pad thickness. I run them until they are just under that width, then I change the disc pads.

How to Install Bike Brake Pads: Easy Step-by-Step Guide for Rim Brakes
Maintaining your bike’s braking system is crucial for safe riding. Replacing worn-out brake pads is…

Are Cantilever Brakes and V-Brakes Interchangeable?
Cantilever brakes and V-brakes are among the most common braking systems in various bike types….

What are Cantilever Brakes?
Brakes are among the most crucial parts of a bike. This fact applies regardless of…

Cantilever Brakes Vs. V-Brakes (What’s Better)
Cantilever brakes and V-brakes are popular for their considerable tire clearance on bikes. These brakes…

A Guide To Storing a Bike With Hydraulic Brakes
The best way to store a bike with hydraulic brakes is to keep it parallel…

7 Best V Brakes for Mountain Bike
Brakes are one of the essential components of an MTB. They let you halt your…
Wheel Inspection
Trueness of the wheel means the amount of irregularity from side to side. When a wheel is very out of true, you get brake rub. Also take note of the roundness which is how close the wheel shape is to a perfect circle. Roundness can be hard to see with the tire on, so strip it down and inspect the naked rim. Pluck at the spokes. They should all have about the same firmness and tone. A wheel tuning stand allows for detecting irregularities and to help make adjustments.
If you have rim brakes, see if the rim has developed a groove from brake pad wear. Look for any major dents, dings or cracks in the rim.
Fork and Shock Examination
Check for any stiffness or abnormal suspension movement. External cleaning is important, but once in while you need to service the shocks by taking them apart and lubing the interior. Once or twice a year should be fine. If you don’t feel confident doing it yourself, let a shop mechanic do it for you. Occasionally, you can add a few drops of lube into the fork stanchions (the part that slides into the fork). Compress the fork or shock to distribute the lube, then wipe off any excess.
Wiggle Test
Many components over time will wear down and develop play or wiggle. For example, wheels should only move in a circle. If you grab the wheel and try to move it from side to side, you should not feel any movement or clunkiness. This same wiggle test can be applied to:
- Pedal cranks
- Brake arms
- Brake levers
- Derailleurs
- Suspension forks
- Shocks
- Dropper posts
- Any other moving bike part
For some components, you can still ride with a little wiggle, but it’s best to replace the part as soon as you can.
Smooth Action Test
Like the wiggle test, you want to check for smooth action of moving parts and components. Check for abnormal hesitation, for example, in dropper post return. Also, take note of any grinding sensation or squeaking.
Headset
It important to detect a loose headset ASAP. The headset is where the handlebar stem inserts into the frame. One way to check this is to grab the stem or handlebar with one hand and the frame with the other. Try to wiggle the handlebar forcefully. If you feel wiggle or knocking, get the headset adjusted fast.
Crank Bolts and Bottom Bracket
Check the large bolts that secure your pedal cranks to the bottom bracket. Crank bolts can come loose over time, especially if you ride a lot of rough terrain. You don’t want to tighten these with all your might, but they should be firm. Also, grab the cranks and feel for abnormal play or knocking in the bottom bracket.
Derailleur adjustment
This isn’t always something scheduled. If the bike is shifting great, no need to adjust. But it will eventually need adjusting. You may need to tighten the cable at the retainer bolt end. Then make fine tune adjustments with the barrel adjuster. Derailleurs also come with adjustment screws to limit how far the chain moves along its shifting path. If your chain comes off or gets caught in the spokes, you may need to adjust these screws.
The screw with an “H” marked next to it is the high gear limit adjustment (smaller sprocket). The “L” is the low gear limit adjustment (larger sprocket). When you tighten either screw, it limits how far the chain can go. If the chain won’t shift onto the biggest or smallest sprocket, you may need to loosen the corresponding screw. Tighten or loosen by ¼ to ½ turns until the derailleur pulley is in line with the sprocket.

Wondering What Derailleur Hanger You Need? (Look No Further)
If there’s one part on my bike that I took for granted in my first…

How Much Does it Cost to Replace a Mountain Bike Rear Derailleur?
There are a lot of things you take for granted about how a mountain bike…

What is a Mountain Bike Rear Derailleur Hanger and How to Fix it
After taking a tumble my bike wasn’t shifting correctly. At the bike shop the tech…
Every 4-6 Months
Longer term maintenance includes:
- Cable check – when performance suffers change cables and housing
- Rear wheel cassette – look at the teeth, check for looseness/play
- Derailleur hanger – change it if it looks damaged or bent
- Tire tread inspection – look at tread depth and for signs of damage
- Bearings – dismantle and re-grease wheel, headset and bottom bracket
Cable Inspection
Cables stretch and get worn down. How frequently this occurs depends a lot on riding frequency and exposure to water. If you notice your brake and/or shifting mechanisms are stiff or sluggish, you may need to replace the cables. When replacing the cables, I usually go ahead and change the cable housings as well. That way I have a fresh new cable system with each maintenance cycle.
Cable change tip: Save the old housings to measure the length of new housing. Invest in a solid pair of bike cable cutters. You’ll be glad you did.
Rear Wheel Cassette
The cassette is the group of sprockets on the rear wheel. Check the teeth. They should be symmetrical and not hooked or sharp. If you change your chain regularly, the sprocket teeth should stay healthy. Take the wheel off the bike and check for play in the cassette. Do this by wiggling the cassette as if you were trying to remove it from the wheel. If there is too much movement, this can dramatically affect shifting.

Derailleur Hanger
Depending on your bike model, you may have a detachable rear derailleur hanger. This component protects your frame in the event that you bang you derailleur. So instead of bending the frame, only the hanger gets damaged. Inspect the hanger every few months or so to see if it is bent or cracked. If it looks abnormal in any way, swap it out for a new hanger.
Tire Tread Inspection
Besides looking for damage, you want to evaluate your tread. If you notice several missing knobs then it might be time to change. Like car tire treads, some use the penny depth test. You place a penny – with Lincoln’s head first – next to the knobs. If you can see Lincoln’s entire head, then the tread is low.
Pro note – Change both tires before races and long MTB trips. You don’t want to get stuck with a ripped worn out tire at a crucial moment.
Get Your Bearings Greased
All rotating components on your bike have a bearing mechanism. The headset, wheels, pedals and bottom bracket should all be taken apart 1-2 times per year and the bearings re-greased. Learn this skill or pay the shop to do it. Some components can’t be taken apart, so you have to buy a new one when it breaks down.
Longevity tip – If you can, buy components that can be opened and serviced. You can keep the same part going for years if you take care of it this way.
Looking for Some More Ways to Help Your Bike Last
- Regular maintenance will keep you pedaling for years. Read – DIY Mountain Bike Maintenance Schedule
- Everyone wants a new bike, find out when it’s time to buy with this article: Repair Old Bike or Buy New – Options
- DIY Mountain Bike Tune Up – A Complete guide to what to repair and how.
Annually
Here are some things you should consider doing at least once a year.
- Hydraulic brake bleed – maybe not always necessary
- Shock Rebuild – inner part cleaning, oiling and greasing
- Disc rotor check – make sure they are still true
Hydraulic Brake Bleed
There’s a bit of controversy over this, but in my opinion, there’s no need to bleed hydraulic brake systems unless you notice a performance problem. Still, before you go running to your shop asking for a brake bleed, check to see if the disc brake pads aren’t worn too thin. Again, the pads should be about the thickness of a dime. Personally, I’ve never bled my disc brake system, and the performance is always spot on.
Shock Rebuild
Suspension components take a beating over time. One to two times a year it’s worth having your shock serviced. This means dismantling, inspecting and cleaning. You may need seals and rings to be replaced, and also the inner workings should be properly oiled and greased. You can learn to do this on your own. When in doubt let your shop mechanic take care of it for you.
Rule of thumb – Rock Shox recommends suspension fork service every 50 hours of riding
Disc Rotor Trueness
Disc brake rotors are very sturdy. Still, they can get damaged or warped over time. Spin the wheel and look at the rotor on edge. If you see any signs of warping, you might want to change the rotors.
Every 3-6 Years
Some might buy a new rig before these time periods. With good maintenance though, a trusty bike can last much longer. When these longer intervals come up, consider changing the:
- Handlebar
- Stem
- Suspension fork and rear shock
- Seatpost
- Saddle
If the components are metal, especially some kind of steel alloy, if there’s no rust you don’t need to change it. Most components these days are aluminum. Can this material fatigue and crack over the years? Yes, but it’s unlikely unless you are a very punishing rider.
Carbon fiber components can fatigue and crack over time as well. Inspect these for cracks regularly. Change ASAP if you see a crack. Otherwise, I agree carbon fiber should be replaced every 3-6 years.
The reason to change the saddle is due to the cushion wearing out over time.
Pro tip – If you find a saddle you love, buy a second one. By the time you need to replace the seat, they might not be selling the same model anymore. A comfy, well-fitting saddle might be the most important component of all.
David Humphries is the creator of DIY Mountain Bike. For me a relaxing day involves riding my mountain bike to decompress after a long day. When not on my bike I can be found wrenching on it or making YouTube videos at 👉 DIY Mountain Bike Read more about David HERE.