After taking a tumble my bike wasn’t shifting correctly. At the bike shop the tech said I needed a new derailleur hanger. I had no idea what he was talking about so I had him explain,
WHAT IS A MOUNTAIN BIKE DERAILLEUR HANGER.
A Rear Derailleur Hanger is a scarificial bracket the connects the derailleur to the bike frame. The hanger makes it easy to repair and re-align the derailleur without an impact destroying the derailleur system or bike frame.
Know that I know what this component is I thought I’d explain the details of: bending, adjusting and replacing a derailleur hanger.

So What Happens When You Bend a MTB Hanger
If you impact the derailleur hard enough to bend it you should keep reading farther down to understand how to replace it. A bent dreailleur will cause the chain to skip around on the gears. Basically the alignment of the chain has been tossed off so the chain won’t track correctly. If this happens on the trail you can bend it back in place. BE CAREFUL though, it is very possible to snap the derailleur connection.
The derailleur hanger is designed to “give” more than the bike frame or derailleur housing. Often time you can get it bent back into position close enough to limp back home. Avoid lots of shifting with this in the field repair.
If you don’t get aligned close enough the derailleur mechcanism could become entangled in the spokes and now you have a real mess.
Sometimes it isn’t the hanger that needs adjustments. This article on “Adjusting the Rear Derailleur” instructs on the basics of adjusting derailleurs to shift better.

Wondering What Derailleur Hanger You Need? (Look No Further)
If there’s one part on my bike that I took for granted in my first…

How Much Does it Cost to Replace a Mountain Bike Rear Derailleur?
There are a lot of things you take for granted about how a mountain bike…

What is a Mountain Bike Rear Derailleur Hanger and How to Fix it
After taking a tumble my bike wasn’t shifting correctly. At the bike shop the tech…
How to Check the Alignment of a Hanger
The first step to see if the derailleur is “out of alignment” is to look at the derailleur from a rear view and check to see if it’s hanging straight down. Often times folks will immediately start adjusting the High and Low screw settings when that’s not the proble.
The derailleur should hang straight down and be on the same plane as the chain.
If the need arises Park Tool has a great Derailleur Hanger Alignment Gauge (Link to Amazon to check the price) This tool bolts onto the hanger and checks the alignment to the wheel. To get the hanger in perfect alignment you need to check at varying positions and this is where the Park Tool shines. Below is a drawing and picture of the gauge.

The neat thing with the Park Tool is that the gauage is actually the bar that is used to bend the hanger into place. I’ve used an adjustable wrench as well. It is really easy to put a “twist” into the hanger. What I mean is that the hanger is straight down but if you look at it from above (looking down from the seat position) the dhanger could be twisted. This twist will make shifting slow and troublesome.
If you’re looking for ways to identify which derailleur hanger you need, check out my article – Wondering What Derailleur Hanger You Need? (Look No Further)
What Tools are Needed to Replace a Derailleur Hanger
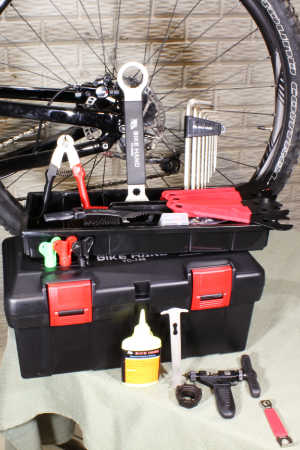
The typical tools needed to change a hanger are:
- Hex Wrench for Removing
- A Torque Wrench with HEX bits
- Lube for Bolts
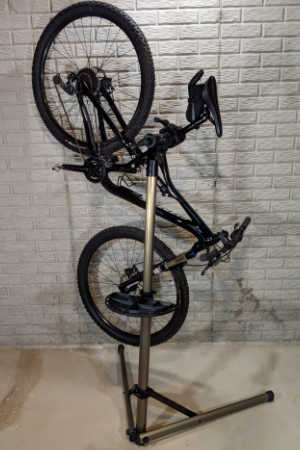
- A Bike Repair Stand is really helpful.
- Wire or Zip Tie to Suspend Derailleur.
MTB Tools I Love and Recommend

I own each of these tools and only recommend things I own and use.
- Bike Hand Bike Repair Stand. Nice mountain bikes don’t have a kick stand so keeping your MTB safe but conveniently stored is essential. I keep my bike on my stand whenever I’m not riding it. This makes it easy to lube the chain, inflate the tires and adjust the derailleur. Highly recommended – Bike Hand Bike Repair Stand (👈 Link to Amazon to see what thousands of others have said)
- A basic MTB toolbox for replacing a chain, adjusting brakes and dialing in the fit. Bike Hand has a 37-piece box that has most of the specialty bike tools to keep your MTB properly maintained. The Bike Hand brand is value packed for the avid rider. Check out the competitive prices with this link to Amazon 👉 Bike Hand 37 pcs Bike Repair Tool Kit
- Get a good air pressure gauge, if you get just a tiny bit serious about MTBing you’re going to start playing with tire pressure. A couple psi can make your tires sticking or not. Get a good gauge, I highly recommend the Topeak Smartgauge D2, it’s accurate, flexible and easy to use. An Amazon best seller, here’s a link 👉 Topeak Smartgauge D2
- Carry a multitool with you on every ride. I’m serious, most of the time you can MacGyver something to get back to the trailhead if you have a multitool. I’ve got the Crank Brothers M19, it’s worn, rubbed and abused – but it still works. Thousands sold on Amazon – check it out with this link 👉 Crank Brothers M19
10 Steps to Swap-out a Bent Rear Derailleur Hanger
- Remove rear wheel, with most newer bikes this is really easy and doesn’t require any tools
- With your hex wrench loosen and then remove the bolt holding the derailleur to the hanger.
- Zip tie the derailleur assembly to the frame, this helps keep it out of the way.
- Now remove the hanger from the dropout this is done with a hex wrench. Sometimes the hanger is made with two pieces. Also look at the inside area of the frame and chech for locating keys.
- Clean all the contact surfaces so the new hanger will fit smooth. A good site to find derailleur hangers is DerailleurHanger.com
- Apply a little lube to the inside and outside of the dropout.
- Loosely install the new hanger with your hex wrench.
- Use a Torque wrench to tighten to correct torque. Especially important on a carbon frame bike.
- Cut the zip tie holding the derailleur and reinstall using your torque wrench.
- Test the gear changes to insure everything is working smoothly.
Why Carry a Spare Shifter Hanger

So with all the steps listed above you might think that changing a hanger is a “do it in the shop” activity. It isn’t, I’ve changed a hanger trail side. With just a multi-tool you can swap out a derailleur hanger in a pinch.
If this seems overwhelming and your debating about having a bike shop do this work, check out this article – How Much Does it Cost to Replace a Rear Derailleur?
Because the hanger is so vulnerable to impact a spare hanger carried in your tool kit is recommended. Read about my recommened tools and gear in this article Mountain Bike Tools: The Ulitmate List.
The typical price of a derailleur hanger varies, but budget for around $30 usd. I always carry a spare, again the design of the hanger is to BREAK if impacted. This saves your bike frame. At one time repairing a bike hanger ment a bike shop actually welded on the frame or sent the frame to the factory for repair. $30 is cheap insurance.
PRO TIP – before you sit down to buy a hanger. Snap a quick picture of the hanger on your bike so you can identify the correct one as you shop online.
Looking for Some More Ways to Help Your Bike Last
- Regular maintenance will keep you pedaling for years. Read – DIY Mountain Bike Maintenance Schedule
- Everyone wants a new bike, find out when it’s time to buy with this article: Repair Old Bike or Buy New – Options
- DIY Mountain Bike Tune Up – A Complete guide to what to repair and how.

David Humphries is the creator of DIY Mountain Bike. For me a relaxing day involves riding my mountain bike to decompress after a long day. When not on my bike I can be found wrenching on it or making YouTube videos at 👉 DIY Mountain Bike Read more about David HERE.