
One of the things I love about mountain biking is all the tools and parts. I’m a gadget guy, so besides riding I’m happy to be working on my ride. So what are the most important mountain bike tools you should own? Well, it depends on the situation.

I wish somebody would have guided me about this when I was starting out. It would have saved me a lot of time and money. So I decided to share my experience to get you up to speed on this topic as fast as possible.
Instead of just a boring list, I’m going to toss out some pearls of veteran biker wisdom to jazz things up a bit.
I’m breaking this topic down into 3 scenarios:
- Essential Tools to have with you on EVERY Ride
- The Beginner DIY Mountain Bike Tool List
- MTB Tools for the Serious Rider and MTB Builder
DIY MTB Pro Tip: Learn a little bit about the trail before you ride. Here’s an article to help 👉 What’s the Difference Between Single Track, Double Track and Fire Roads for MTBs
Finally, at the end I’ll share some repair anecdotes (i.e. dumb things I did) that might save you from a world of trouble and wasted cash.
ENOUGH JABBER ALREADY… LET’S DO THIS.
Another related article on when to do maintence on your mountain bike can be found -> MTB Maintenance Schedule
Here’s a video of my Essential Tools to Carry on a Mountain Bike
Essential Tools to have with you on EVERY Ride
If you ride long enough, your going to have a “mechanical” (that is, a need for bike repair on the trail). Now, you can be one of those riders who never brings tools and bums them off of their buddies. Or you can dive into the woods prepared. Be that rider who always has the right tool at the right time… even to share.
Carry these on every ride:
- Hand pump & patch kit
- Spare inner tube (Yes I run tubeless, but have you heard of a “snake bite”)
- Tire lever
- MTB multi tool
- Master chain link
- Zip Ties
Hand pump and patch kit
At the very minimum, you need to be able to change a flat. This is by far the most common trailside repair. I once remember having to change a flat FIVE times in one ride. Not fun, but I learned to fix a flat fast.
Hand pumps are offered in a wide range of sizes and shapes. Make sure the pump will fit in the pack you use. Also, make sure the pump head fits your valve (Presta vs. Schrader). Don’t get a pump that does anything else but pump. A tool-pump combo is more likely to break than help you on the trail.
Patch kits basically come in 2 types:
- Fast glueless patch – Like a glorified sticker. Works well and is the fastest solution.
- Glue patch – It’s beefier but more time consuming. You have to apply glue to the innertube, let it dry, then apply the patch. Repeat. Let the glue dry before you apply the patch. Remember to clean and roughen the patch area with sandpaper first.
Racer tip: Consider a CO2 cartridge pump. It inflates a flat in seconds. It’s not really necessary for normal trail riding though. Learn to use CO2 at home first before taking it to a race. Also, slightly inflate your tube and tuck it into your water pack bungee cord. You don’t need to be fishing around and unrolling the tube while other racers pass you by.

Can I Put A Tube In A Tubeless Bike Tire?
Our choice of tires plays a significant role in the overall comfort of our bike…

Which Inner Tubes Are Best to Avoid Punctures?
When you’re out on a ride, the last thing you want to deal with is…

The 2023 MTB Inner Tube Sizing Guide
Proper inner tube sizing of your replacement tube is critical, not just on your mountain…

What Does Tubeless Ready Mean (And Why It Matters)
Have you ever strayed into a bike shop and noticed that there are both tubed…

Does the Brand of Inner Tube Matter? (2023 Edition)
I’ve been biking for as long as I can remember, so I’ve seen my fair…

Are Thicker Inner Tubes Better? (Investigation Results)
Inner tubes are crucial for my bike’s suspension and maintaining the right tire pressure for…
Spare inner tube
You might be asking, “Why do I need a spare tube if I have a patch kit?” Well, even a weight weenie like me carries a spare tube. First of all, it’s faster. On the first flat, I just swap out the tube. Then I patch for any subsequent flat. Also, some tube damage can’t be fixed with a patch kit. If you experience a large gash or valve damage and don’t have a spare tube, then you’re walking home.
BTW, always pack out your trash, including used tubes. Plus, when you get home, make repairs if possible to any tube you stashed in your pack.
Tire Lever
This hard plastic stick helps you remove the tire. It’s a neat trick to do this without the lever, but for a really tight tire bead, a lever saves you from lots of frustration. These are commonly included in multi-tools as well. If you have 2-3 levers it makes the job easier, but one will do in a pinch.
Do not use a screwdriver to get the tire off. The metal can damage the rim and the pointy tip can damage the inner tube.

Mountain Bike Multi-Tool
In the old days, you had to collect several tools to make sure you could make common bike repairs. Now, there’s an entire multi-tool industry. And this gadget guy is loving it.
One of my favorites is the CrankBrothers M19 Multi Tool. <-Link to review This sleek little nugget contains all of these tools in one neatly folding package:
- Chain tool 8/9/10 speed compatible
- Hex wrenches #2, 2.5, 3, 4, 5, 6, 8
- Open wrenches 8 & 10mm
- Flat screwdriver #2
- Philips screwdrivers #1 & #2
- Spoke wrenches #0, 1, 2, 3
- TORX T-10 & T-25
You’ll note this tool does not include a tire lever, but it otherwise will solve 99% of repairs that can be done on the trailside.

Side note: I have a thing about chain tools. When you’re tired and have to split and splice a chain in the woods, it can be a real pain. Even worse if it’s wet and muddy. I admit I like carrying a stand alone chain breaker apart from the multitool. Yes, it’s a bit of extra weight, but IMO, it’s worth it.
THE RIDER’S DILEMA
Do you carry your tools in your waterpack or a pack that hangs on the bike? I prefer the waterpack. First, it saves weight – one less pack. Second, an on-the-bike pack might affect in-air bike handling – probably mostly psychological, but I “feel” it. Third, on muddy days, the on-bike pack seems to be a mud magnet. So stuff it in your water pack.
MTB Tools I Love and Recommend
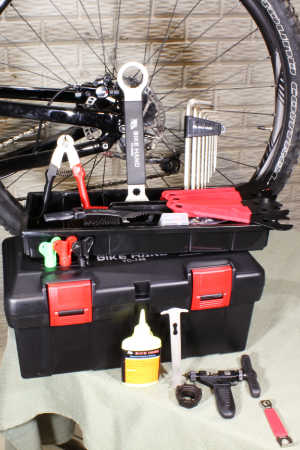

I own each of these tools and only recommend things I own and use.
- Bike Hand Bike Repair Stand. Nice mountain bikes don’t have a kick stand so keeping your MTB safe but conveniently stored is essential. I keep my bike on my stand whenever I’m not riding it. This makes it easy to lube the chain, inflate the tires and adjust the derailleur. Highly recommended – Bike Hand Bike Repair Stand (👈 Link to Amazon to see what thousands of others have said)
- A basic MTB toolbox for replacing a chain, adjusting brakes and dialing in the fit. Bike Hand has a 37-piece box that has most of the specialty bike tools to keep your MTB properly maintained. The Bike Hand brand is value packed for the avid rider. Check out the competitive prices with this link to Amazon 👉 Bike Hand 37 pcs Bike Repair Tool Kit
- Get a good air pressure gauge, if you get just a tiny bit serious about MTBing you’re going to start playing with tire pressure. A couple psi can make your tires sticking or not. Get a good gauge, I highly recommend the Topeak Smartgauge D2, it’s accurate, flexible and easy to use. An Amazon best seller, here’s a link 👉 Topeak Smartgauge D2
- Carry a multitool with you on every ride. I’m serious, most of the time you can MacGyver something to get back to the trailhead if you have a multitool. I’ve got the Crank Brothers M19, it’s worn, rubbed and abused – but it still works. Thousands sold on Amazon – check it out with this link 👉 Crank Brothers M19
The Beginner DIY Mountain Bike Tool List
The amazing thing about mini-tools is that you can complete a ton of repairs with such a compact device. Still, when you are working on your bike at your home repair shop, it’s better to have full sized tools. This makes repair work easier and more precise.
If you have the space, hang a tool board – the kind with holes and hooks – on your wall. Then draw an outline of each tool so they go back in place after use. Being organized makes repairs faster, and it keeps your workplace safer.
For the beginner, these tools are a great start:
- Flat and Phillips head screwdrivers – Make sure to include a smaller set for derailleur limit screw adjustments.
- Tire levers
- Spare inner tubes
- Talcum powder – When you change a tube at home, sprinkle a little inside the tire to prevent the tube from sticking.
- Glue patch kit – For flat repair at home, uses glue patches. If applied properly, these will never leak. Since it can dry up, check the tube of glue every few months.
- Pliers – normal and needle nose
- Hex wrenches – Sizes 2, 2.5, 3, 4, 5, 6, 8 and 10mm. Get a set of L-shaped wrenches. You can also get a three pronged Y-wrench with the most common bike sizes (3, 5, and 6mm). This tool is more comfortable especially for making quick adjustments.
Mechanic’s pet peeve: The folding all-in-one hex wrench set might be convenient, but it is not a quality tool. Plus, it can’t get to hard to reach places.
- Open ended box wrenches 7, 8, 9, 10, 13, 14, 15 and 17mm. On a budget? Get a sturdy adjustable wrench (“crescent” wrench).
- Pedal wrench – 15mm. This is to remove the pedals. It’s a thinner wrench which offers easier access to the pedals. Some pedals have a wide enough base that accept a standard 15mm open end wrench. Remember, your pedals on the left side (looking down from the saddle) tighten in the opposite direction.
- Chain tool – Larger size with firm grip makes chain breaking easier. I like using quick link chain links. They snap into place instead of having to press the pin in with a chain tool.
- Spoke wrench – Bike wheel spokes attach to the rim with a tiny bolt or nipple. These are adjusted to true the wheel. Get a dedicated spoke wrench that fits your wheelset nipples.
Mechanic’s tip: Spokes get tightened basically by pulling them farther away from the hub. When you rotate the nipples, it puts tension on the spoke. Be careful not to overtighten. No only can the spoke snap, but it also begins to protrude into the space where the inner tube lives. This can lead to a puncture. Also, avoid using the multi-tool spoke wrench if possible, as it can round off the nipples making it impossible to adjust later.
- Cable cutter – This is not a wire cutter. The cable cutter is heavy duty and cleanly cuts cable housing and cables. The Swiss made Felco cable cutter is phenomenal and will last a lifetime.
- Wire cutter – I use this mostly to crimp cable end caps. My mechanic trademark is 2 notches.
- Lube and grease
- Biodegradable degreaser
- Chain cleaning device – Fits around the chain and has spinning brushes and a reservoir for degreaser. For deep chain cleaning.
- Tire pump – The floor type with a built in gauge.
- Apron – Keep your clothes clean.
- Zip ties and straps – These come in handy when you least expect it. For example, when splicing a chain, if you strap the derailleur open, you get more slack in the chain which makes working on it easier.
- Magnetic retriever – Basically a magnet on a stick. If a small part gets stuck somewhere, you pull this out instead of hoisting your bike and shaking it.
Quality Tip – Don’t go to a big department store tool section to get your bike repair tools. In many cases, they won’t have what you’re looking for since the tools are specialized. If you’re serious about doing your own maintenance, you want shop grade quality.
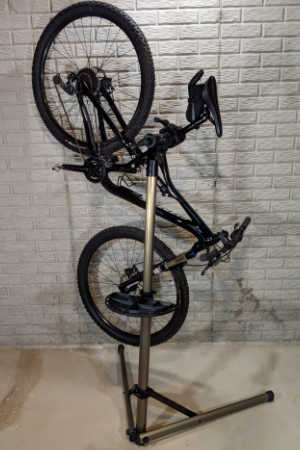
BIKE REPAIR STAND
I’m putting this item between the beginner and serious rider categories. The reason is that a repair stand is more expensive than other tools, and you can get by without it. However, I can’t imagine doing bike repairs without my stand.
A stand makes things much, much easier. Plus, you avoid damaging components when you flip your bike upside down. For example, if your shifter pods sit on top of the handlebars, they’ll get broken when you flip the bike to work on it.

The BikeHand Pro Mechanic Repair Stand (<- Check out my write up!)is a great option. It’s lightweight but sturdy. This model is foldable and portable, so you can take it to races or on overnight bike trips. The clamp mechanism keeps your bike firmly in place while you work. Also, it’s got a magnetic tool/parts tray so you don’t lose any tiny screws.
Since it’s so easy to set up, I’ve even seen people use these kinds of stands at the trailhead before their weekly ride. While you wait for the others to show up, you can do some fine tuning.
PRO MECHANICS SAY, “DON’T BE A HAMFIST. BE SAFE.”
What’s a hamfist? It’s the guy or gal you never, ever want to touch your bike since it comes back more broken than before. For example, when using any kind of wrench, make sure it’s well seated before turning. Hex wrench bolts that get rounded out may become useless. Take your time when making repairs.
Make sure you have good lighting in your work area. Plus, wear safety goggles. When cutting a wire or loosening a bolt, any metal that lets loose can end up lodged in your eye, so protect yourself.
MTB Tools for the Serious Rider and MTB Builder
How do you know you’re a “serious” rider? It might mean you want to do nearly every repair or upgrade installment yourself. When I was first starting out, they didn’t have tons of online instructional videos like today. So I spent a lot of money due to trial and error.
I thoroughly enjoy working on my own bike. There’s nothing more satisfying than having a ride that functions smoothly since you put the time to make it work right.
By the way, make sure you test ride after each repair. Take it for a spin around the block at least, and make sure everything is set right. Do a few bunny hops while your at it to make sure nothing shakes loose.
Shortcut – To make things easier, you might consider a Bike Hand Advanced Mechanic Tool Kit. It has 33 tools in one package, tool box included. If you want to quickly ramp up your repair arsenal to the next level, this kit is a no-brainer.
WORKBENCH
Build it or buy it, a solid wooden bench is important for advanced bike building and repair. Plus, install a heavy duty vise to hold parts in place while machining or adjusting.
These additional tools are needed for more advanced repairs and bike building:
- Pressure gauge – For more precise tire and suspension pressure measurement. The Topeak Smartgauge D2 (Link to my review) fits Presta and Schrader valves, and it has a digital readout.
- Hacksaw – with a fine tooth blade designed for cutting metal
- Metal filing tool
- Exacto cutting tool
- Scissors
- Chain length measurement tool – See my anecdote at the end of the article to know what I think about this tool.
- Socket wrench – 7, 8, 9, 10, 13, 14, 15mm sizes.
- TORX wrench – sizes T10, 25 and 30
- Crank puller – This removes the cranks from your bottom bracket. Sizes may differ, so check with your shop before purchasing.
- Chainring nut wrench – Two pronged tool that keeps chainring nut in place to adjust the bolt.
- Bottom bracket tool – Used to install/remove the bottom bracket. There’s a wide variety of sizes and types here, so check what fits your ride. You’ll also need the appropriate wrench to loosen/tighten the bottom bracket.
- Snap-Ring pliers – for removing snap-rings from bottom brackets, forks, pedals, etc.
- Cone wrench – For adjusting loose-bearing wheel hubs. Sizes vary here too, so check your wheel.
- Core Remover Tool – For tubeless wheel systems. This tool removes Presta and Schrader valve cores. IMO, Stan’s NoTubes Core Remover Tool is the gold standard.
- Tire sealant – For tubeless systems and for puncture proofing bike tubes.
- Cassette lockring tool – For removing sprockets from the rear hub.
- Chain whip – Keeps the cassette in place while loosening the cassette lockring.
- Suspension grease – Use a non-lithium based grease for suspension components.
- Loctite – Keeps screws in place. Use judiciously, like on chainring bolts.
- Torque wrench
Note about torque: Most parts come with fairly strict tightening specs. You don’t want to over or under-tighten. The former can damage parts and the latter can leave them too loose. Torque wrenches may come in gauge type or self-limiting type. Self-limiting torque wrenches click when you reach a certain tension, so you always tighten just right. The Venzo Bike Torque Wrench (Link to article – I love this wrench) is one of the most versatile and precise torque wrench kits out there.
- Penetrating fluid to release tight or seized parts.
- Degreasing tank – Used to soak parts for full degreasing. Use only bio-friendly degreaser.
From this point forward on the list, you may only need the following tools if you are building a bike up from the bare frame. Some tools are for very advanced or uncommon repair needs, such as disc rotor truing.
- Headset press – For installing a new headset.
- Fork-crown race slide hammer – For installing a fork crown race.
- Headset cup remover
- Threadless headset star-nut installation tool
- Ball peen hammer
- Wooden mallet – For installing headsets. If the mallet doesn’t have a soft surface, you should cushion the blow with a shop rag or piece of rubber.
- Wheel truing stand – You place your wheel in it and the guides help you determine how wheel trueness and roundness. For thru axles, you may need an adaptor to fit the wheel into the stand.
Money saving hack: The wheel truing stand on a budget – use your bike. Rim brake pads can be used as the lateral guides. You can also tape sticks or metal rods to your frame to use a guides. Still, using a real truing stand is way easier. On any stand you can only true a wheel if the tire is removed.
- Dishing tool – Checks for wheel centering.
- Specialty spoke wrenches – For unusual sized/shaped spoke nipples and for internal nipples.
- Rotor truing gauge – For disc brake rotors. Can be attached to wheel truing stand.
- Rotor alignment tool – For straightening bent disc brake rotors.
Mechanic’s note: Disc brake rotor alignment can be tricky. The room for error inside the brake caliper is minimal. If you can’t get it super straight, it will affect performance and brake pad wear.
- Hydraulic brake bleed kit – Kit type can vary with brand.
- Brake bleed block – Keeps brake pistons in place while bleeding the brake system.
- Chain keeper – Attaches to rear dropout to keep chain in place while cleaning.
- Carbon grip compound – For securing carbon fiber handlebars and seatposts.
Credit due – A large majority of this tool list was adapted from Lennard Zinn’s book, Zinn & the Art of Mountain Bike Maintenance. <- (Link to Amazon) It’s an excellent resource.
BUILD UP YOUR TOOL CHEST GRADUALLY
This list is pretty complete, but far from exhaustive. There are all kinds of bikes out there, and some need special tools to fix or service them. Now unless you have some money set aside to buy the Bike Hand Advanced Mechanic Tool Kit, you might not be thrilled about spending so much on tools.
What I did was buy tools as I needed them. For example, the first time I needed to remove the cassette, I learned about the necessary tools and bought them. And the next repair led me to buy other specialty bike tools. This method allows you to build your tool collection as a matter of necessity. Plus, you learn to use them as you advance.

Repair and Maintenance Anecdotes
DRIVETRAIN
The first time I decided to replace a gear cog led to an unplanned big spending layout. I had heard that if the sprocket teeth get hooked and pointy, that means the cog should be replaced. Also, my chain would not shift well and got hung up and jammed into the front chainrings. This is called chain-suck.
At first I tried to replace the chain. The problem is that when your drivetrain gets worn down, a new chain doesn’t fit onto the distorted sprocket teeth. The new chain jumps all over the place, and it’s unrideable. Then I replaced the cassette, next the chainrings, and so on. In the end I had spent hundreds of dollars and a ton of time back and forth buying parts. I ended up buying an entirely new drivetrain. I think I even had to buy a new rear derailleur, but I’m not sure.
Now, I just change my chain every 3-4 months, with the seasons. Yes, I can measure the chain, but it’s a pain. Regular chain replacement prevents the teeth on the sprockets from getting deformed. My drivetrain works like new at all times.
THE FORCE IS NOT WITH ME
While installing a new set of pedals, the one side was a bit stuck. I though, “Must just be a tight fit.” So I forced it. When I reached the end of screwing the pedal on, I realized it was crooked. I had falsified the threads and ruined the cranks. You can get them re-machined, but not always. Never force a bike part. If needed, remove, clean and maybe even apply light lube. Once you see it fits right, unscrew, remove the lube and reinstall.
LOCTITE OR NOT?
Lots of controversy here. Some put this glue-like material on every bolt. Others say it’s not needed when the parts fit right. The front chainring bolts are notorious for coming loose. I use Loctite there. Also, the bolts that clamp braking mechanisms to the bike deserve a bit of extra security. Blue Loctite is fine for bikes. Red Loctite requires heat to disassemble the part. I can’t think of any reason red Loctite would be used on a bike.
LAY OUT THINGS IN ORDER
The first time I took apart my fork to service it myself turned into a nightmare. I removed the pieces thinking I would remember how to re-assemble them later. Big mistake. I had to look up the manual to figure it out.
Save time by having a clean cloth next to your work station. Then lay out each piece the way it sits in the component. On tiny misplaced part can ruin your repair session and cost you time and money.
IT’S ALL ABOUT PRACTICE AND DISCIPLINE
If there’s one thing I learned about bike maintenance is that it takes time and money to get good at it. I mean, it’s an actual job people get paid for. Regular riders on the other hand don’t have many bikes to work and learn on.
When you move into uncharted bike repair territory, make sure you have enough time. Watch a few online instructional videos if you can first. Being a hurry is the most common reason you’ll hamfist something. Don’t get frustrated if you mess up a repair the first time. Learn and keep moving forward.
Learn more about Pedals, Handlebars and Brakes
- Handlebars on MTBs are wide, find out why – Why are MTB Handlebars so Wide?
- Should you upgrade your handlebars? Read – Are Handlebars Worth Upgrading?
- Universal pedals? Read all about it here – 9 Universal Pedals for Your MTB
- Learning how to Jump? Learn more with – How to Jump a MTB with Flat Pedals
- Keep your disc brakes clean – How to Clean Mountain Bike Disc Brakes
- Is their a difference? – Mountain Bike V-Brakes vs Disc
David Humphries is the creator of DIY Mountain Bike. For me a relaxing day involves riding my mountain bike to decompress after a long day. When not on my bike I can be found wrenching on it or making YouTube videos at 👉 DIY Mountain Bike Read more about David HERE.