
I’ve got an older hardtail Gary Fisher mountain bike that I dearly love. I’ve ridden it for thousands of miles, but with newer bikes in my fleet, the Fisher is collecting dust.
I’ve decided to start a project to make this old friend a commuter road bike. I’ll be using it to run errands to the post office or for quick getaways to the coffee shop. I want to convert it to something a little more road worthy.
Here’s a list of things to consider to make a mountain bike more road friendly:
- Tires and tire pressure – reduces rolling resistance
- Saddle position (fore-aft, height) – for an efficient pedal stroke
- Addition of a mirror – Ok, looks weird but makes things safer.
- Remove or lock out suspension – get more out of your pedal stroke
- Rack on back – carry your goodies and do some errands
- Lights and reflectors – you need to be seen on the road
- Mud flaps and fenders – don’t show-up dirty
- Handlebar ends – allow you to sit higher
- Handlebar type – Drop Vs Straight
- Pedals – clipless shoes are difficult to walk in
- Gearing – granny gears aren’t much use on the road

The Road is Also an Adventure
Back in the day, I was a mountain bike purist. Or was I a snob? The reason I say this is because I only wanted to ride mountain bikes. In my narrow vision back then, road bikes were for wimps.
I remember a slogan from a bike ad that once said something like, “It’s a big world. Ride it.” How true that is. Your bike or bikes can take you nearly anywhere. And any bike is a good bike.
These days there’s a steed for nearly any kind of riding terrain or situation. You can even morph different types to adapt to new riding needs. So let’s get to it.
Tires Change Everything

When it comes to riding dirt vs. asphalt, tire selection is everything. Those thick knobbies that help you climb dirt like a goat become heavy anchors on the road.
If you’re going to stay on the road 100% of the time, go for a slick tread. If you might venture off onto gravel or trail, them a semi-slick works best. These have many really low profile knobs.
I really recommend the WTB Slick Comp Hybrid/City Bike Tire. (Link to Amazon for price) It has a rugged casing to combat curbs and comes in both 26-in and 29-in to fit your mountain bike.
You can even get super narrow road bike-like slicks in mountain bike diameters. Tire change is the first – and most important – change to make your mountain bike more like a road bike.

How Long To Bike 20 Miles (Bonus Calculate For Any Distance)
Biking at an average speed of 12.8 miles per hour it will take 94 minutes…

100-Mile Mountain Bike Training Tips
Now that summer is here, we are already thinking about what races and tour rides…
How to Ride a Rock Garden on a Mountain Bike
As summer rolls around and the trails start opening up, that means it’s time to…

How to Pace Yourself on a Mountain Bike
We all know that feeling; you’re out on the trail, someone paces you, and you…

The Ultimate Indoor Mountain Bike Training (With a Free Plan)
As mountain bikers, we all love riding on trails. Sometimes though, our schedule or workout…

11 Off Season Mountain Bike Training Tips
What do you think when you hear the word off-season? Do you imagine yourself hanging…
Ultra Narrow Mountain Bike Tires
If you want max speed and efficiency, then the narrower tires are best. You can get tires as narrow as 28mm that fit MTB rims. For example, you can get 26 inch tires in narrow road bike widths. Stiil, you’ll never be able to hop a curb with these.
If road surface speed is a huge priority, you should consider getting a road bike. One compromise might be a semi-narrow slick tire. Again check out the WTB Slick Pro (Amazon link)
Urban Assault Concept – Curbs? No Problem!
The thing I love about mountain bikes is the go anywhere attitude. Now, if you are setting up a commuter bike, you might want to maintain that capability. Need to bunny hop a pothole? No problem if you run a somewhat beefy tire.
I wish I could provide a bottom line here, but it all depends on where and how you plan to ride.
Tire Pressure on the Road
Conventional wisdom states that higher pressure means less rolling resistance and higher speeds. Modern investigation, however, appears to be proving otherwise. Tire design and material make a big contribution to rolling speed. Your body weight and road surface conditions matter too.
If you overinflate, you get bumpy chatter which reduces speed. In the past, road tire pressures ranged from 100-130 psi or even higher. But it appears you can go as low as 60 psi and not lose speed.
Lower pressure allows the tire to conform to bumps and grip turns better. This means improved handling and cornering. If you look at Formula 1 auto racing, they fight about how low they are allowed to run tire pressure.
Fore-Aft Bike Saddle Position
The debate over fore-aft saddle position is eternal and hyper complex. For example, Keith Bontrager once wrote, “Saddle position is dependent on lots of things, i.e., rider physiology, preferred muscle group loading, prioritizing pedal position efficiency vs. handling, pedaling out of saddle vs. in saddle and position of rider on saddle.” Yikes.
A popular method to dial in saddle position is the knee over pedal spindle (KOPS) technique. You sit on the bike with your cranks parallel to the ground. Have a friend hold a plumb bob at the front of your forward kneecap and see where it falls. The line should hit the center of the pedal axle. If not, adjust fore-aft position accordingly.
In the end though, it’s personal preference. If your knees hurt, you may need to make adjustments.
Seat Height – Get it Right
A common method to determine seat height is by sitting on your bike with the cranks perpendicular to the ground. With bike shoes on, your heel should scape against the pedal. Again, personal preference matters here too.
If you’re sticking exclusively to the road, you might be able to inch up your seat height 1-2 mm at a time. Be sure not to raise the seat to where your hips begin to rock when pedaling.
Add on a Rear View Mirror
The minimalist rider might cringe at the idea of a rearview mirror, but the hardcore commuter knows the value of vision. If you frequently navigate busy city streets, then a rearview mirror makes the ride safer and more enjoyable.

One excellent model that I recommend is the Mirrycle MTB Bar End Mountain Bike Mirror. (Link to my Review) It’s sturdy, light and easy to install. And most importantly, it gives you an excellent view of what’s behind you.
Boing or No Boing? – Lock-Out Suspension
Planning to ride smooth road surfaces only? Then you might want to swap out your suspension fork for a rigid one. This will make the ride much lighter.
If you can’t afford it, see if your suspension fork can be locked out. The bobbing up and down when you pedal is a power drain. Again, if you plan to venture off the beaten path now and again, keep the suspension in place. Remember to unlock it on the trails!
Same goes for rear suspension. Lock it out if you can. If you can’t lock out the suspension on either end, another option is to pump up the pressure and eliminate as much of the sag as possible.
Bike Rack and Panniers – The Why for Commuting

If you’re like me, your bike is more than just a recreational toy. It’s a tool. This means when you can, you use your bike for errands. A rear bike rack is essential for this. It may add a bit of weight, but if you want to transport things, a rack is essential.
Taking the concept a bit further, you might also invest in panniers. If you plan to do some light grocery shopping, for example, these side packs are awesome and easy.
All that being said, if I can, I rely on a backpack for transport mostly. I prefer to keep my bike clear of clutter. However, I have ridden bikes with baskets mounted on the handle bars. The convenience was unbeatable.
Lights and Reflectors – Yes, Please

If you want to avoid getting hit by a car, ride smart, defensively and remain visible. At night, reflective surfaces and lights are essential. You want a headlight up front and a blinking red light on the rear. These two points of reference help drivers see where you are headed.
You can also get stylish riding jerseys or jackets with reflective designs. These are a compliment to, not a replacement for, a good pair of lights.
Mud Flaps and Fenders

It takes some pretty serious bad weather to keep me off my bike. Still, if I’m commuting to a place where I have to be presentable, a stripe of mud on my backside won’t do at all. Fenders are the only way to go.
There are plenty of aftermarket choices out there. If your location sees a lot of damp weather, you might opt for a fender design that bolts on semi-permanently. Remember, both front and rear wheels kick up grime so you need fenders for both.
Here’s an add on with a history. Years ago, bar ends where the rage. Back then, it wasn’t a real mountain bike if it didn’t have bar ends. Some of them were oddly large and complex. Then, some short stubby versions came out. Now, many riders go without them. Still, the variety of hand positions is nice to have.
Handlebar Ends – Old is New Again
If you do long commutes, you might want bar ends. This gives you the added advantage of being able to sit up straighter, which can be good in heavy traffic. The more upright your body posture, the wider your vision. Plus, you’re more visible to drivers.
Handlebar Type – Drop Vs Straight

I’m not even sure if I should go here, but some might consider changing a straight mountain bike handlebar to a curved drop road style. I think this is overkill for a MTB to commuter conversion. Again, if you get that serious about road riding, get a full blown road bike.
Now on the flip side, if you are converting a road bike to commuter, you can install a straight handlebar to give you a better view of traffic.
Pedal Choices – So Many Ways to Pedal
Road bike pedals are highly specialized, and it’s nearly impossible to walk around in road cleats. If you’re just taking short jaunts around town, then regular flat pedals will do. Now, if you’re thinking longer distance rides, you might want to go clipless.
Still, there are some who will want more options. But who wants to be changing pedals all the time for different riding situations? Yes, of course there’s an answer.

ROCKBROS MTB Pedals Review: Why Cyclists Are Switching
Having equipped three of my bikes with ROCKBROS MTB Pedals, I’ve come to see them…

Do Bike Pedals Require A Pedal Wrench?
I always need help to loosen up my pedals during bike maintenance. I try using…

Should You Pedal When Shifting Gears on a Bike (Smooth Shifting)
You need to pedal when shifting, but it’s best to ease up on the pressure…

Will Mountain Bike Pedals Fit Road Bike Cranks Arms? We Find Out!
Looking to change up the feel of your road bike? Changing the pedals from clipless…

9 Universal Mountain Bike Pedals You Need to See
Okay, let’s get one thing straight – bicycle pedals for your mountain bike are not…

Can I Get Bigger Pedals for My Mountain Bike?
A bigger pedal gives a mountain biker added confidence when jumping and also provides more…
Versatile Pedal Options
I know some of you are thinking, “What if I want to be open to many possibilities?” For example, one day you might just need to grab a quick coffee with a friend. Another day, you might be riding to work. Then on the weekend, you’re thinking about a longer day ride that might have a few off-road sections.

The best kind of pedal for multi-use is something along the lines of the Shimano PD-A530 Dual Platform. (Link to the Review I did) On one side, it’s a regular flat pedal. On the flip side, you can clip in with a cleated shoe. Nice.
Change Front Gear Ring – Go Big
Road bikes have two chainrings up front instead of the MTB’s three. The gears are larger for several reasons. First, road bikes have less resistance. Also, road bikes are lighter. This means the average gearing can be higher.
You could swap out the typical MTB triple chainring for a dual road set up, but beware. If your chainrings and cassettes are worn out, you will need to replace the entire drivetrain (chain, chainring and rear cassette).
Why? Because the components get worn down, and putting a brand new chainring will lead to major shifting problems. That’s why, as I’ve mentioned in other articles, I change my chain with every season or about every 4 months.
Why Don’t You Just Get a Road Bike Already?
If you’ve noticed a common thread here, it’s this: if you are going crazy converting your MTB into a road bike, just get a road bike. A big investment to change the gearing, for instance, could be better used saving up for a roadie.
It’s All Good – So Try Your MTB on the Road

That being said, when it comes to bikes, nobody has all the answers. If you want to hang tons of road components onto your 26 inch MTB dual suspension frame, then go for it. I remember the days when dual suspension was ridiculed by the naysayers. Now it’s like bread and butter in the MTB world.
If it’s comfy for you and you like it, then build your bike the way you want.
Random Commuting Tips
Here are some things to keep in mind when commuting:
- Look drivers in the eye at intersections. This gets their attention.
- When in heavy traffic or parking lots, stand on the pedals. They see you better that way.
- Don’t forget your lock if you live in a high crime area.
- At least one spare tube and a pump on all rides beyond a comfortable walking distance.
- If you’ve never rode your route to work, do a weekend test run before the real thing.
Pack and Prep the Night Before Your Commute
Get your bike and stuff ready before you go to bed. Here’s the list:
- Lay out your riding gear.
- Fill your water bottle and put it in the fridge to chill (don’t forget it like I do).
- If needed, pack change of clothing, towel, etc.
- Pack pre-moistened wipes if you don’t have a shower at work.
- Give your bike a once over.
- Check tire pressure, brakes, etc.
- Check the weather forecast and adjust plans or gear as needed.
See how long the prep list is? This means it takes time. You can’t squeeze it in between coffee and brushing your teeth. So do it the night before and ride into work on time.
MTB Tools I Love and Recommend

I own each of these tools and only recommend things I own and use.
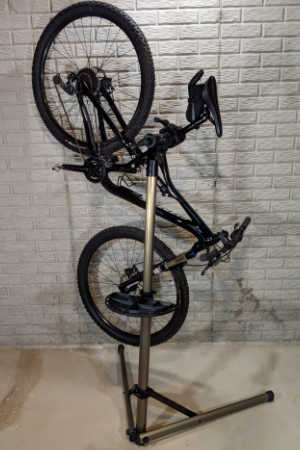
- Bike Hand Bike Repair Stand. Nice mountain bikes don’t have a kick stand so keeping your MTB safe but conveniently stored is essential. I keep my bike on my stand whenever I’m not riding it. This makes it easy to lube the chain, inflate the tires and adjust the derailleur. Highly recommended – Bike Hand Bike Repair Stand (👈 Link to Amazon to see what thousands of others have said)
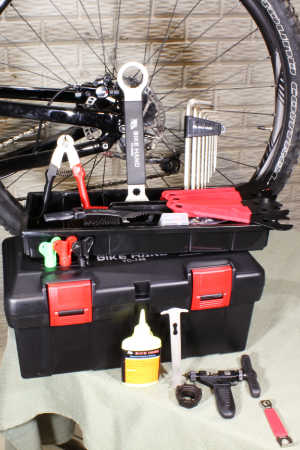
- A basic MTB toolbox for replacing a chain, adjusting brakes and dialing in the fit. Bike Hand has a 37-piece box that has most of the specialty bike tools to keep your MTB properly maintained. The Bike Hand brand is value packed for the avid rider. Check out the competitive prices with this link to Amazon 👉 Bike Hand 37 pcs Bike Repair Tool Kit
- Get a good air pressure gauge, if you get just a tiny bit serious about MTBing you’re going to start playing with tire pressure. A couple psi can make your tires sticking or not. Get a good gauge, I highly recommend the Topeak Smartgauge D2, it’s accurate, flexible and easy to use. An Amazon best seller, here’s a link 👉 Topeak Smartgauge D2
- Carry a multitool with you on every ride. I’m serious, most of the time you can MacGyver something to get back to the trailhead if you have a multitool. I’ve got the Crank Brothers M19, it’s worn, rubbed and abused – but it still works. Thousands sold on Amazon – check it out with this link 👉 Crank Brothers M19
Be Careful Out There and Ride It
In many ways, road biking is actually much more dangerous than mountain biking. Cars can be deadly, so stay alert at all times. I ride in an assertive defense mode. This means if I have to own the lane to stay safe, I will. Remember though, cars always win in a collision.
Road riding can be a joy. Blowing by cars in traffic is awesome. Plus, there’s nothing like getting a ride in and completing a task at the same time. It’s a big planet, right? So ride it.
David Humphries is the creator of DIY Mountain Bike. For me a relaxing day involves riding my mountain bike to decompress after a long day. When not on my bike I can be found wrenching on it or making YouTube videos at 👉 DIY Mountain Bike Read more about David HERE.
