
As a mountain biking enthusiast, I’ve always loved the idea of packing up a meal and some drinks and enjoying a stop on my bike, but having enough storage has always been a problem. So, the search was on to find a solution to carry more than those “essential items”.
I’d seen pannier bags on road and touring bikes and admired their ample storage capacity and convenience, but I wondered, “Can you put pannier bags on a mountain bike?”
Join me as I take you through my journey of equipping my mountain bike with pannier bags for my next off-road adventure.
Yes, pannier bags can be installed on mountain bikes. However, when considering the bags the rear suspension, rack attachment points and type of pannier bag should be considered. As a general rule full suspension MTB’s are not good candidates for pannier bags.
Installing a Rack Compatible with Pannier Bags
The rear bike rack is the key to having pannier bags on your MTB. Select a system that provides a full gambit of bag options when reviewing the rack. I’ve fallen in love with the Ibera PakRak system, it really provides value and function. Read more and check prices on Amazon here 👉 Ibera PakRak System

Instructions for Installing a Rear Bike Rack
Installing a rear rack on a mountain bike for pannier bags involves a few simple steps. Please note that these instructions are for a general case; your specific rack and bike may require different steps or additional hardware. Make sure to consult your rack’s instruction manual for any specific requirements.
- Gather materials and tools: You’ll need the rear rack, any included mounting hardware, and tools such as Allen wrenches, wrenches, or a screwdriver, depending on your bike and rack design.
- Locate attachment points: Identify the mounting points on your bike frame. Most bikes have eyelets near the rear dropouts (where the rear wheel attaches to the frame) and on the seat stays (frame tubes connecting the rear dropouts to the seat post).
- Attach the lower part of the rack: Align the lower mounting points of the rack with the eyelets near the rear dropouts. Insert the bolts through the rack’s mounting holes and into the eyelets, tightening them with the appropriate tool. Do not fully tighten the bolts yet, as you may need to make adjustments later.
- Attach the upper part of the rack: Adjust the upper mounting arms of the rack to align with the eyelets or braze-ons on the seat stays. Attach the arms to the eyelets using the provided bolts and tighten them with the appropriate tool. Ensure the rack is level and centered over the rear wheel.
- Fine-tune and secure: Once the rack is properly positioned and aligned, go back and fully tighten all the bolts to secure the rack in place. Ensure that there is no movement or wobbling of the rack.
- Test for stability: Apply pressure to the rack to ensure it’s stable and can support the weight of your pannier bags. Check for any interference with the wheel, brakes, or gears.
- Install pannier bags: Now that the rack is securely installed, you can attach your pannier bags to the rack. Ensure they are mounted evenly on both sides and securely fastened according to the manufacturer’s instructions. This often involves hooks, straps, or clips that attach the bag to the rack.
- Test ride: Take your bike for a short test ride with the pannier bags installed to ensure that everything is stable, secure, and functioning properly. Pay attention to any noise, rubbing, or instability that may indicate an issue with the rack or bags.
DIY MTB Pro Tip: I’ve got full written instructions in another article 👉 Installing a Rear Cargo Rack
Rack compatibility
Mountain bikes may have different frame designs and suspension systems compared to road or touring bikes. You’ll need to find a compatible rear rack for your mountain bike, preferably one designed specifically for mountain bikes with or without rear suspension. Brands like Tubus, Topeak, and Axiom offer mountain bike-compatible racks.
Frame Attachment Points
Attachment points on a bike for a rack typically involve specific mounting points on the frame, designed for secure and stable installation. Here are the common attachment points you will find on most bikes:

- Eyelets at the rear dropouts: These are small holes near the rear axle of the bike, where the wheel connects to the frame. These eyelets provide a solid mounting point for the lower part of the rack.
- Seat stay braze-ons: Some bikes have threaded braze-ons or eyelets on the seat stays (the frame tubes that run from the rear axle to the seat post). These attachment points are used for connecting the upper part of the rack.
- Chainstay bridge: Some rear racks can also attach to the chainstay bridge, a small tube or plate connecting the chainstays (the frame tubes that run from the bottom bracket to the rear dropouts). This attachment point is usually used when there are no eyelets on the rear dropouts.

- Seat post clamp: If your bike lacks eyelets or braze-ons for rack attachment, you can use a seat post clamp with built-in eyelets or a post supporting the bike rack.
Understand Bike Brake Systems
It makes a difference in the mounting of the rack if you have a bike with disc brakes. The brake system can interfere with the rack. A bike with disc brakes will need a wider rack for clearance to the brake calipers and hoses.
Bikes with rim brake bikes may need adapters to attach the rack at the rear dropouts.
Can You Put Panniers on a Full Suspension MTB?
No, but you do have options. Full suspension mountain bike can be more challenging compared to hardtail or rigid bikes.
But all is not lost, there are other bag options to increase the carrying capacity of your MTB.
Since full suspension bikes have a rear shock and more complex frame designs, traditional rear racks may not fit or function properly.

To mount a storage bags on a full suspension MTB, you can consider the following options:
- Specialized racks: Some manufacturers produce rear racks specifically designed for full suspension bikes. These racks often attach to the seat post, avoiding interference with the suspension movement.
- Beam racks: These racks clamp onto the seat post and extend a beam over the rear wheel, providing a platform to attach pannier bags. While they may not be as sturdy as frame-mounted racks, they can work for lighter loads. Note that the weight capacity of beam racks is generally lower than traditional racks, so be cautious not to overload them.
- Alternative bags: If mounting a rack and panniers proves too difficult or cumbersome, consider using alternative bikepacking bags, such as frame bags, seat/saddle bags.
DIYMTB Pro Tip: Wondering about a basket on an MTB? Read about it here 👉 Can I Put a Basket on a Mountain Bike
Bike Frame Material Considerations for Panniers
Steel and Aluminum will be the recommended materials. Strength, Durability and Weight are the main consideration factors. But to detail further:
Pros of Steel
Steel is a traditional frame material known for its strength, durability, and relatively low cost. It has a natural ability to absorb vibrations, providing a comfortable ride. Steel frames often have eyelets and braze-ons for mounting racks and other accessories.
Steel Cons
However, steel is heavier than other frame materials, and it is susceptible to rust if not properly maintained.
Pros of Aluminum
Aluminum is a popular choice for modern bike frames due to its lightweight nature and affordability. It offers a stiffer ride compared to steel, which can lead to better power transfer but less shock absorption. Aluminum frames often feature rack mounts or eyelets.

Aluminum Cons
The weld-on and eyelets typically are not as strong as steel. Watch that the rack and attachment points are compatible and follow the manufacturer’s weight limit guidelines.
Carbon Fiber
Carbon fiber frames are known for their lightweight and stiff properties, but I wouldn’t recommend attaching a rack on pannier bags to a carbon bike. Carbon tends to be more delicate to abrasions and impacts which is common when using an MTB with panniers.
MTB Tools I Love and Recommend
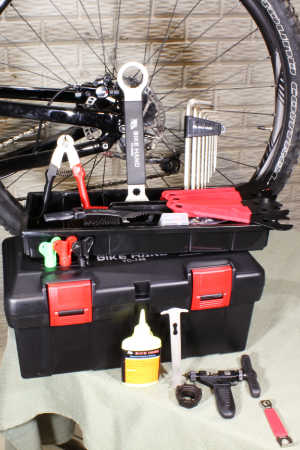

I own each of these tools and only recommend things I own and use.
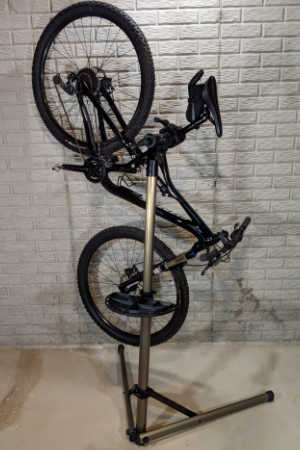
- Bike Hand Bike Repair Stand. Nice mountain bikes don’t have a kick stand so keeping your MTB safe but conveniently stored is essential. I keep my bike on my stand whenever I’m not riding it. This makes it easy to lube the chain, inflate the tires and adjust the derailleur. Highly recommended – Bike Hand Bike Repair Stand (👈 Link to Amazon to see what thousands of others have said)
- A basic MTB toolbox for replacing a chain, adjusting brakes and dialing in the fit. Bike Hand has a 37-piece box that has most of the specialty bike tools to keep your MTB properly maintained. The Bike Hand brand is value packed for the avid rider. Check out the competitive prices with this link to Amazon 👉 Bike Hand 37 pcs Bike Repair Tool Kit
- Get a good air pressure gauge, if you get just a tiny bit serious about MTBing you’re going to start playing with tire pressure. A couple psi can make your tires sticking or not. Get a good gauge, I highly recommend the Topeak Smartgauge D2, it’s accurate, flexible and easy to use. An Amazon best seller, here’s a link 👉 Topeak Smartgauge D2
- Carry a multitool with you on every ride. I’m serious, most of the time you can MacGyver something to get back to the trailhead if you have a multitool. I’ve got the Crank Brothers M19, it’s worn, rubbed and abused – but it still works. Thousands sold on Amazon – check it out with this link 👉 Crank Brothers M19
Attachment Systems for Panniers
One popular universal pannier bag attachment system is the Ortlieb Quick-Lock system. This system is designed to be compatible with a wide range of bike racks and allows for easy and secure mounting and removal of pannier bags.
Ortlieb’s Quick-Lock system comes in different versions, such as the Quick-Lock1 (QL1), Quick-Lock2.1 (QL2.1), and Quick-Lock3.1 (QL3.1), each offering various features and levels of adjustability.
Recommendation for Pannier Bag Attachment
I recommend buying the rack and pannier bags together as a system. As much as Ortieb has “communized” the attachments many more cost affective brands don’t use the Quick-Lock System.
Popular Pannier Bag Brands

Each brand offers a variety of models with different features, capacities, and price points:
- Ibera: Offer a variety of pannier bags with different designs, capacities, and features to cater to various cycling needs, such as commuting or touring. Read reviews and check prices on Amazon 👉Ibera PakRak System with Panniers

I own the popular PakRak which features a family of bags with compatible “”Quick Connect Features” to attach bags, panniers and coolers
2. RockBros: RockBros produces a range of pannier bags that cater to various cycling activities, from touring to commuting. They are known for their well-designed attachment systems and use of durable materials. Read reviews and check prices on Amazon 👉RockBros Bike Pannier Bag
3. Thule: Thule is a well-known brand for their car racks and accessories, but they also produce high-quality pannier bags. Thule panniers often have a sleek, modern design and feature a variety of attachment and closure options. Read reviews and check prices on Amazon 👉 Thule Shield Bike Pannier Bag
4. Topeak: Topeak offers a range of cycling accessories, including pannier bags. Their bags are often designed with practicality and functionality with value in mind. Read reviews and check prices on Amazon 👉Topeak Bike Pannier Bags
Different Styles of Pannier Bags
Pannier bags are versatile storage solutions designed for cyclists, providing ample space to carry essential items such as clothing, food, tools, and electronics during commutes, long rides, or touring adventures.
The pannier bags easily attach to bike racks, allowing for a balanced distribution of weight and a more organized storage option compared to backpacks or messenger bags.
Traditional Pannier Bags
Traditional pannier bags are known for their rectangular or box-like shape, secure attachment systems, and easy accessibility. They often come in pairs, allowing for balanced weight distribution on both sides of the bike.
Roll-Top Closure Bags
Roll-tops, feature a flexible top closure that rolls down and fastens, providing a watertight seal to protect contents from the elements while also offering adjustable storage capacity.

Saddlebag Panniers
Consist of two connected bags draping over the rear wheel and attaching to the bike rack or seat post, providing balanced storage capacity and a classic aesthetic for cyclists.
Packing Everything Up in Pannier Bags
In conclusion, my journey to equip my mountain bike with pannier bags has been a rewarding experience. Understanding the compatibility of racks, bike frames, and various pannier styles has helped me find the perfect storage solution for my off-road adventures. I hope my insights can help fellow cyclists find their ideal pannier setup, ensuring a more enjoyable and well-prepared ride.
Looking for Some More Ways to Help Your Bike Last
- Regular maintenance will keep you pedaling for years. Read – DIY Mountain Bike Maintenance Schedule
- Everyone wants a new bike, find out when it’s time to buy with this article: Repair Old Bike or Buy New – Options
- DIY Mountain Bike Tune Up – A Complete guide to what to repair and how.
David Humphries is the creator of DIY Mountain Bike. For me a relaxing day involves riding my mountain bike to decompress after a long day. When not on my bike I can be found wrenching on it or making YouTube videos at 👉 DIY Mountain Bike Read more about David HERE.
Resources and Additional Reading
- DIY Mountain Bike YouTube – How to Install the Ibera Bike Rack – https://youtu.be/VDXSmZrzC5w
- REI Co-op Expert Advice – How to Choose Bike Panniers https://www.rei.com/learn/expert-advice/bike-panniers.html
- CyclingAbout – The 10 Best Panniers for Touring of 2021 https://www.cyclingabout.com/best-panniers-for-touring/
- BikeRadar – Buyer’s Guide to Bicycle Touring Bags https://www.bikeradar.com/advice/buyers-guides/buyers-guide-to-bicycle-touring-bags/
- Adventure Cycling Association – Choosing the Right Bike Rack and Panniers https://www.adventurecycling.org/resources/blog/choosing-the-right-bike-rack-and-panniers/