
Ahhh! That horrible squeal when your kids applies the front brakes on their mountain bike. I went over and check the brakes and found out they weren’t even working. I created this article to explain how to adjust the front brakes on a Mongoose Mountain Bike:
- Do you have linear pull (rim) or disc brakes? These are instructions for linear pull (rim) brakes.
- Check to insure the cable is seated correctly in the brake assembly.
- Loosen the nut (either a 5mm allen or 10mm wrench) that holds the cable. The cable should move freely.
- Squeeze the brake levers together with your hand until they are lightly touching the rim.
- While squeezing, tighten the cable nut.
- Lift the wheel and see if it spins freely
- If the brakes touch the rim, adjust the cable at the brake hand lever.
I know the above sounds easy, so let’s dig into the details, plus we can talk about fine tuning the brakes.
Disc or Linear Pull Brakes
Disc brakes are located at the hub of the wheel. In mountain biking disc brakes are considered an upgrade from rim brakes. Disc brakes aren’t as susceptible to getting wet which considerable reduces stopping performance. Most Mongoose bikes sold don’t have disc brakes.
Side Pull Linear Brakes or what I call rim brakes are super common. Most Mongooses have these and include a centering spring adjustment as well. This type of brake is light and can apply tremendous stopping force. These are most common on road bikes. Let’s first make sure the brake cable is attached the brakes, this is an easy fix.
Squeezing the brake shoes tight to the rim allows the “noodle” (curved metal on cable) to be installed into the brake carrier assembly.

Since the brakes need to be opened to remove the tire. This simple reinstallation can get the brakes working again.
Now on to Adjust the Brakes
We’ll tackle four major adjustments for the Mongoose Brakes;
- Adjusting the Brake Pads
- Adjusting the Pad Alignment
- Centering the Brake Pads on the Rim.
- Fine tuning at the Hand Levers
Tools needed:
- 10mm open end wrench
- 5mm allen wrench
- Needle nose pliers
- Phillips head screw driver

How To Identify Mongoose Bikes (With 3 Easy To Follow Tips)
Identifying Mongoose bikes is a question many cycling enthusiasts often ask when planning to purchase…

The Best Mongoose Bikes You Need to Try Riding
What is the best Mongoose bike? If you are familiar with the brand Mongoose, you…

What Are Mongoose Bikes Good For?
Mongoose bikes are divided into different types based on their functions. People usually want different…

Why Are Mongoose Bikes Are So Expensive? (I Find Out)
Shopping for a Mountain Bike (MTB) in department big box stores, and you might see…

Which Brand Is Better, Mongoose or Schwinn
Mongoose and Schwinn are both well-known bike brands, as you likely already know. However, do…

Mongoose Mountain Bike Gear Adjustment: A Complete Guide
If you’ve ever owned a bike with gears you’ve heard that grinding, clacking, chattering sound…
Adjusting the Brake Pads
Loosen the cable nut with either a 10mm wrench or 5mm allen. My bike is a little older, so it uses the 10mm. With the cable freely moving through the locking bolt, move the pads into the rim.
The official distance is an 1/8 of an inch, but I’ve found that holding the pads loosely against the rim yields a good result. Tighten down on the cable.
Lift the front wheel and give it a spin. If the wheel spins freely, take the bike for a quick test ride to insure everything is in working order.
If the brake pads touch the wheel while free spinning I usually adjust the barrel screws on the hand levers to “fine tune” the brakes. Screwing the barrel in provides a little more clearance to the rim.
Adjusting the Brake Pad Alignment – and killing the squeal
Sometimes the pads can get knocked out of alignment with the rims. This usually occurs when removing the tires without detaching the brake cable. Jamming the tire through the brake pads is a recipe for damage.

The objective is to have the pads centered up and down and not twisted to the rim. If the pad is out of alignment loosen brake pad bolt.
I don’t like loosening to the point that the pad is flopping around, but to the point that you can move the position of the pads with your hand.
Slide and turn the pad so it is aligned and centered on the rim. Then tighten the bolt. This usually takes a second adjustment, it seems like during the tighten the pad always twisted just a little.
With one side done move around to the other side and repeat the process.
MTB Tools I Love and Recommend
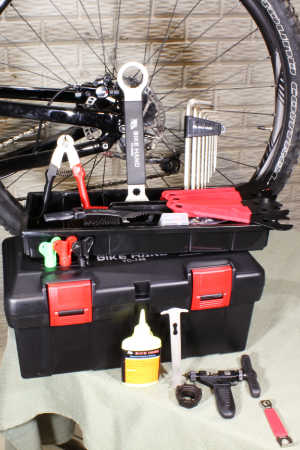

I own each of these tools and only recommend things I own and use.
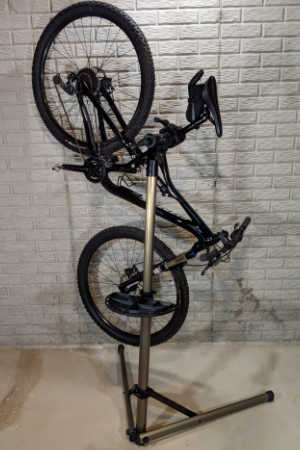
- Bike Hand Bike Repair Stand. Nice mountain bikes don’t have a kick stand so keeping your MTB safe but conveniently stored is essential. I keep my bike on my stand whenever I’m not riding it. This makes it easy to lube the chain, inflate the tires and adjust the derailleur. Highly recommended – Bike Hand Bike Repair Stand (👈 Link to Amazon to see what thousands of others have said)
- A basic MTB toolbox for replacing a chain, adjusting brakes and dialing in the fit. Bike Hand has a 37-piece box that has most of the specialty bike tools to keep your MTB properly maintained. The Bike Hand brand is value packed for the avid rider. Check out the competitive prices with this link to Amazon 👉 Bike Hand 37 pcs Bike Repair Tool Kit
- Get a good air pressure gauge, if you get just a tiny bit serious about MTBing you’re going to start playing with tire pressure. A couple psi can make your tires sticking or not. Get a good gauge, I highly recommend the Topeak Smartgauge D2, it’s accurate, flexible and easy to use. An Amazon best seller, here’s a link 👉 Topeak Smartgauge D2
- Carry a multitool with you on every ride. I’m serious, most of the time you can MacGyver something to get back to the trailhead if you have a multitool. I’ve got the Crank Brothers M19, it’s worn, rubbed and abused – but it still works. Thousands sold on Amazon – check it out with this link 👉 Crank Brothers M19
Centering the Brake Pads to the Rim
This is probably the toughest adjustment, usually requiring a couple test rides and readjustments.
The starting adjustment is to make sure the front tire is centered between the forks. You can measure this, but I just eye ball it. If the wheel isn’t centered between the fork arms then loosen the wheel nuts and while squeezing the brakes re-tighten the nuts.
With the wheel centered between the fork arms, the next step is to look at the gap between the pads and rim.
If the gap is uneven you’ll need to adjust the spring tension on each brake pad arm to “pull” the pad into a centered position.
Using a Philips screw driver turning the spring tension screw clockwise will move the pad AWAY from the rim. Turning counterclockwise moves the pad CLOSER to the rim.

Starting on the side that is closest to the rim, adjust the spring to move it either toward or away from the rim. Your targeting a 1/8 inch clearance.
Pull on the brake lever a couple times, this will actuate the brakes and have the pads return to a normal at rest position.
Usually you need to readjust again after doing this, once the brake stays in the 1/8 clearance position and the wheel spins freely move on to the opposite side. It’s normal to repeat this step 3 or 4 times.
An important note – Only make small adjustment and then actuate the brake lever. I only turn the screw a quarter to a half turn. These small adjustments make a significant change in the spring position and tension.
The final step is to squeeze the brake levers as hard as you can. Then take the bike for a little test ride.
Sometime you may run out of adjustment. The easiest way to correct this is to add a little slack in the brake cable. Simple loosen the cable locking bolt and slide an 1/8 of an inch of cable through the bolt and retighten.
Hand Lever Adjustments – Tuning the Brakes
The last step is the make the fine-tuning adjustments at the hand levers. The levers have a barrel screw and a locking nut.

The brake pads should engage the rim when the lever is pulled about ¼ to 1/3 of the way. This allows for the correct pressure to be applied to the rims.
With the locking bolt loosened, turn the barrel screw counterclockwise. This will tighten the brake pads a little. Essentially you are pre-pulling the cable a little.
If while riding you find the brake pads are too tight, screwing the barrel screw clockwise will loosen the pads slightly.
You Know Your Complete Making Adjustments
The final step is double checking what you’ve done. A quick test ride is good, plus lifting the wheel to insure it free spins.
Some other things to look at to confirm your done:
- The brakes do not drag on the rim
- The brake pads move freely and are equally spaced from the rim.
- The hand lever engages at the ¼ to 1/3 area and does not depress fully to the handle bar.
With all the above done, your brakes should be in good working order.
I’ve also included a video adjusting the brakes on a Mongoose Mountain Bike.
Want to Learn More About MTB Brakes?
- If you’ve ever spilled chain lube on your disc brakes, you’ve experienced the feeling of not being able to stop. Read this article – How to Clean MTB Disc Brakes
- Disc brakes are a game changer. If you don’t have them – Learn how to install in this article – How to Install Disc Brakes on a MTB
- I’ll let you in on a little secret. Keeping your bike maintained will help you ride faster, safer and longer. Read this article and get a FREE PDF maintenance schedule. MTB Maintenance What to Do and When (with Free PDF)
David Humphries is the creator of DIY Mountain Bike. For me a relaxing day involves riding my mountain bike to decompress after a long day. When not on my bike I can be found wrenching on it or making YouTube videos at 👉 DIY Mountain Bike Read more about David HERE.