Last season I took my bike to the Smoky Mountains to do some riding in the park. Not many people know this, but from May until September the GSMNP closes Cades Cove Loop twice a week in the morning. You can get more details here.
I carry my MTB inside my minivan. While my bike was in the van, something fell on it and bent the rear wheel pretty bad. I was able to ride the bike during the trip, but it wasn’t right. When I got home the bike went into the shop to have the wheel trued.

How to Overhaul a Freehub (Step by Step)
If you start hearing crunching when your rear wheel is spinning or if the rear…

Freewheel vs Freehub (How Do I Know What I Have?)
What do you do when you’re riding along and it sounds like someone is eating…

A Complete Guide to Bike Axle Thread Sizes
The different axle choices for my mountain bike have always baffled me. There was a…

What Is a Mountain Bike Dropout? (Complete Guide)
“You know your front dropout is loose?” the mechanic asked me when I dropped my…

How to Assembly a Mountain Bike Wheel
Last season I took my bike to the Smoky Mountains to do some riding in…

How to Remove and Install a Cassette on a Mountain Bike
I am getting my mountain bike ready for spring and, after taking it for a…
Can a Bent Mountain Bike Rim Be Fixed?
Yes, most times a bent mountain bike wheel can be fixed. For sample bends turning the spokes as detailed in this video can remove most of the wheel wobble. Bike shops can assess the wobble a give you an opinion if it can be straightened.
The damage to my bike was pretty severe, but luckily shop was able to fix it. The shop technician did warn me that I might break some spokes though, as he had to put extreme tension on the spokes to get the wheel true.
Sure enough after a couple small hucks (Check out this article describing HUCKING) some spokes broke. So I ordered the components to re-build the wheel and kept riding. Read about if you can ride with broken spokes in THIS article.
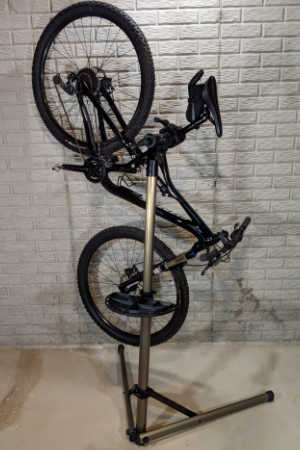
Moderately bent wheels usually need a truing stand. The picture below shows what a Portable Truing Stand looks like and links to an excellent value on Amazon.
MTB Tools I Love and Recommend
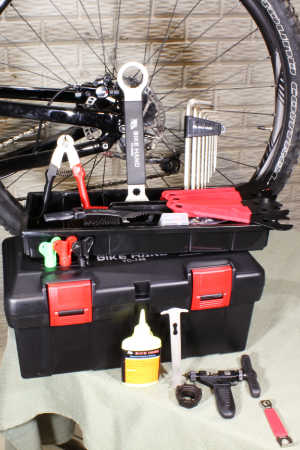

I own each of these tools and only recommend things I own and use.
- Bike Hand Bike Repair Stand. Nice mountain bikes don’t have a kick stand so keeping your MTB safe but conveniently stored is essential. I keep my bike on my stand whenever I’m not riding it. This makes it easy to lube the chain, inflate the tires and adjust the derailleur. Highly recommended – Bike Hand Bike Repair Stand (👈 Link to Amazon to see what thousands of others have said)
- A basic MTB toolbox for replacing a chain, adjusting brakes and dialing in the fit. Bike Hand has a 37-piece box that has most of the specialty bike tools to keep your MTB properly maintained. The Bike Hand brand is value packed for the avid rider. Check out the competitive prices with this link to Amazon 👉 Bike Hand 37 pcs Bike Repair Tool Kit
- Get a good air pressure gauge, if you get just a tiny bit serious about MTBing you’re going to start playing with tire pressure. A couple psi can make your tires sticking or not. Get a good gauge, I highly recommend the Topeak Smartgauge D2, it’s accurate, flexible and easy to use. An Amazon best seller, here’s a link 👉 Topeak Smartgauge D2
- Carry a multitool with you on every ride. I’m serious, most of the time you can MacGyver something to get back to the trailhead if you have a multitool. I’ve got the Crank Brothers M19, it’s worn, rubbed and abused – but it still works. Thousands sold on Amazon – check it out with this link 👉 Crank Brothers M19
When to Replace an MTB Wheel
If your rim is dented, cracked or you break spokes trying to true it, you need to replace the rim. Riding a bike with these types of problems is unsafe. The fun in mountain biking is getting exercise in the outdoors with the added excitement of navigating rocks and jumps. You don’t want to crash and ruin a riding season because of a wheel failure.

How Much Does it Cost to Replace a Mountain Bike Rim?
A low end rim is going to cost about $45 usd. Unfortunately you should also replace the spokes. Yes – you can remove all your old spokes/nipples and reuse them. Typically you’ll damage a couple in the process. The cheapest set of spokes and nipples will cost right around $25 usd.
I looked into lacing up a wheel, but would have needed to purchase a truing stand ($80) and wheel alignment gauge ($55) as well. After watching the video below I decided to BUY a complete wheel.
A complete wheel is going to cost you anywhere from $70 to $400 if you want a high end carbon rim. I bought a decent quality wheelset that included both front and rear wheels for $237.44. This wasn’t a high-end set, but just a decent quality name brand.

Steps to Assemble a New Mountain Bike Wheel
It isn’t too difficult to build up an MTB Wheel. The rear wheel will take a little bit of extra time if you’ve decided to replace the cassette (this is the stack of gears on the rear wheel). I assembled the my rear wheel, cassette and also replaced my chain. Read this article about how long an MTB chains lasts.
Tools Required to Assembly a Mountain Bike Wheel
I’m going to describe assembling a REAR Wheel. It’s a little bit harder to do. If your assembling a front wheel the steps are pretty much the same except for the cassette installation steps.

- Chain Whip – to hold the cassette while tightening or loosening.
- Freewheel Socket or Wrench – to remove freewheel.
- Chain Break – for sizing the chain to correct length.
- Torque Wrench Set that includes TORX bits – for brake rotor/disc. ( I really love my Venzo Torque Wrench link to Amazon to check it out)
- Tire Levers – for installing tires, much better than screw drivers.
- Bike Repair Stand – eases derailleur adjustment and bike assembly process
Get some good tools. You don’t need to go with PRO grade stuff. A real game changer for me was a bike repair stand. You can read about the bike repair stand I use Cost Effective Mountain Bike Stand
A List of Wheel Components to Get
- Wheel
- Chain
- Tire
- Tube (I’m not running tubeless on this bike)
- Cassette
- Brake Rotor
- Thru Axle (most of these are interchangeable)
1.Remove the old bent wheel. If your saving the brake rotor, tube and tire remove those from the wheel.
2. I usually install the brake rotor first. It’s easy to get chain lube on your hands then transfer it to the brake disc if your playing with a greasy cassette.
3. Lay the rotor onto the wheel aligning the holes. Make sure the rotor is facing the correct way. (Read more about installing disc brakes in this article (How to Install Disc Brakes on a MTB)
4. Start the 6 bolts and tighten to the point that you are still able to move them ever so slightly.
5. Tighten in a star pattern to recommended torque. This is usually 6-7 Nm. Please use a torque wrench playing with brakes rotors and calipers. Check out the one I use in this article: Best Value in a Mountain Bike Torque Wrench
6. With the disc on flip the wheel and drop the cassette onto the wheel hub. Usually the cassette will have a large set of gears, then one or two lose gears. These gears fit onto a key way on the wheel hub.

7. Install the freewheel lockring and screw down by hand. You should start to feel a “chattering”. This is the knurling on the nut interfacing with the knurl on the gear.
8. Using your freewheel wrench torque the lockring into the wheel hub housing down to 28 to 30 Nm.
9. Partially install your tire, leaving one side of the bead open for the tube to be installed. Many MTB tires are directional so double check that the wheel is oriented in the right direction.
10. Lay the tube into the tire and insert the presta valve. Looking to learn more about presta valves read: What is a Presta Valve.
11. I like to put enough a little bit of air into the tube at this point to make sure it doesn’t have any twists or kinks.
12. Fully install the tire. If it’s tough to pop the last little bit of the bead on, use a tire lever. Be careful if using a tire lever so you don’t nick the tube.
13. At this point the wheel is assembled. Time to install onto the bike, cut the chain and adjust the derailleur.
14. With the wheel on the bike and the thru axle torqued down, test the brakes. Usually these will be fine.
15. Lay the chain onto the two biggest gear rings. The largest gear at the pedals and the largest gear on the rear cassette.
16. Overlap the chain and mark where they meet. ADD TWO LINKS. This will be where you break the chain.
17. Route the chain through the derailleur and connect ends with a master link.
18. Cycle through the gears with the wheel moving. Sometimes everything will align, but most of the time adjustments are needed.
19. Adjust the high stop and low stops on the derailleur and cycle through gears again.
20. Adjust the gear selector, this is usually a thumbscrew at the shifter located on the handle bar.
21. With the gears working on the stand, it’s time for a test ride.
22. With the bike assembled find a safe area for a test ride.place. Grab your bike multi-tool, I love my Crank Brothers M19 (Link to Amazon) it has everything to adjust derailleurs. Ride around for 15 minutes shifting the gears up and down to make sure everything is working. Usually some times slight adjustments are needed during this test ride.
With the test ride complete, IT’S TIME TO FIND SOME SINGLE TRACK AND KEEP GRINDING!
Looking for Some More Ways to Help Your Bike Last
- Regular maintenance will keep you pedaling for years. Read – DIY Mountain Bike Maintenance Schedule
- Everyone wants a new bike, find out when it’s time to buy with this article: Repair Old Bike or Buy New – Options
- DIY Mountain Bike Tune Up – A Complete guide to what to repair and how.
David Humphries is the creator of DIY Mountain Bike. For me a relaxing day involves riding my mountain bike to decompress after a long day. When not on my bike I can be found wrenching on it or making YouTube videos at 👉 DIY Mountain Bike Read more about David HERE.