
It’s time to replace the cogs (also called the cassette) on your rear mountain bike wheel. (The teeth are all rounded, the chain is stretched out.) You’ve already bought the replacement cassette, so you just need a wrench to unscrew it and then you can thread the new one on, right? Wrong!
To change your mountain bike cassette cogs, you’ll need a cassette-lockring remover, a chain whip and a wrench. Fortunately, the process is virtually the same for both SRAM and Shimano, so once you have the knowledge and tools, you’re set for all future cassette replacements.

How to Remove Your Mountain Bike Cassette
As I mentioned, there are two essential tools for removing your cassette cogs: a chain whip and a lockring-remover. The cassette-lockring remover (also called a “cassette removal tool”) removes the ring that locks the cassette on the wheel. Since the cassette is made to spin, you also need something to keep it from spinning while you’re unscrewing the lockring. That’s where the chain whip comes in.
Check out the video of removing a mountain bike cassette. Or, read on for step-by-step instructions for removing your mountain bike cassette (once the wheel is off the bike):
- Remove the quick release skewer.
- Wrap the chain whip around a cog that’s at least two cog up from the smallest cog. The chain needs to completely wrap around the cog (A Pedro’s cog wrench can be used instead of a chain whip tool). Wrap the chain whip in the drive direction.
- Insert the lockring remover. The lockring is the piece that holds the smallest cog on. Both the lockring and the lockring-remover are splined. The lockring-remover can only be inserted with these splines lined up.
- Hold onto the lockring-remover with a crescent wrench. Hold the chain whip tool in place with one hand and unscrew the lockring using the wrench in your other hand
NOTE: If the lockring is so tight that the lockring-remover pops out while you’re wrenching, you can insert the quick release skewer (minus the springs) and tighten it to hold the tool in place. But, once you’ve loosened the lockring a fraction, you’ll need to remove the QR to loosen it completely and remove the lockring.
- Remove all the cogs together. Some cog sets are cassettes with the rings bolted together and some are loose rings separated by spacers, while others are a combination of both. If you’re removing the cassette cogs for a cleaning or wheel hub repair (meaning you’ll want to put this same cassette back on the wheel), make sure you keep the stack together, exactly as it is, to save yourself the trouble of reassembling rings and spacers.
- If you’re replacing the entire cog set, slide the new cassette on the freewheel hub, with the splines aligned, and tighten the lockring back in place. The cassette and the hub will have one spline slot that’s larger or smaller than all the others, and this is known as the “key” so that you can slip the cassette onto the hub correctly.

How to Make Your Own Chain Whip (When you’re desperate, stingy or into re-purposing old bike parts)
I have a small bike repair area and an even smaller budget, so I stock my tool bench with versatile, multi-functional tools. As much as possible, I avoid specialized tools that only serve one purpose and just take up precious space and money. (NOTE: This is my personal, DIY bike repair area, not a commercial shop.) A chain whip is a tool that serves one purpose only. However, there’s not really any other multi-functional tool that you can substitute. The good news is: It’s not a tool with intricate specifications made of hard-to-find, expensive parts. So, you can use old bike parts and scrap wood, and it’s very easy to make your own chain whip!
If you’re desperate and don’t have a chain whip to remove your cassette (or you’re discerning in tool selection like me), this is how to make your own chain whip tool:
- All you need is an old chain, a piece of wood (handle-sized), some large staples or nails and a hammer.
- Lay the board lengthwise on the ground with the skinny side upwards.
- Lay the chain along the length of the skinny edge. Hammer a nail into the last link, about halfway along the board. Use nails or staples or other fasteners to pin the chain along the remaining length of wood.
- Wedge the tip of the board under a cog tooth that’s at least two rings higher than the smallest ring. Wrap the chain completely around the cog and hold it for leverage.
- Remove the lockring with your cassette lockring-removal tool.
MTB Tools I Love and Recommend

I own each of these tools and only recommend things I own and use.
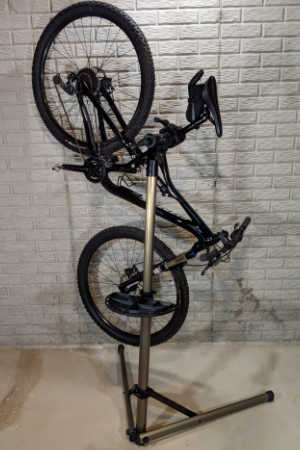
- Bike Hand Bike Repair Stand. Nice mountain bikes don’t have a kick stand so keeping your MTB safe but conveniently stored is essential. I keep my bike on my stand whenever I’m not riding it. This makes it easy to lube the chain, inflate the tires and adjust the derailleur. Highly recommended – Bike Hand Bike Repair Stand (👈 Link to Amazon to see what thousands of others have said)
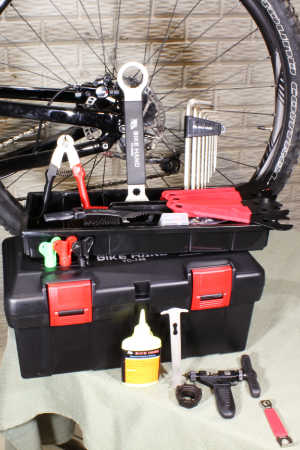
- A basic MTB toolbox for replacing a chain, adjusting brakes and dialing in the fit. Bike Hand has a 37-piece box that has most of the specialty bike tools to keep your MTB properly maintained. The Bike Hand brand is value packed for the avid rider. Check out the competitive prices with this link to Amazon 👉 Bike Hand 37 pcs Bike Repair Tool Kit
- Get a good air pressure gauge, if you get just a tiny bit serious about MTBing you’re going to start playing with tire pressure. A couple psi can make your tires sticking or not. Get a good gauge, I highly recommend the Topeak Smartgauge D2, it’s accurate, flexible and easy to use. An Amazon best seller, here’s a link 👉 Topeak Smartgauge D2
- Carry a multitool with you on every ride. I’m serious, most of the time you can MacGyver something to get back to the trailhead if you have a multitool. I’ve got the Crank Brothers M19, it’s worn, rubbed and abused – but it still works. Thousands sold on Amazon – check it out with this link 👉 Crank Brothers M19
When Do You Change the Cassette on Your Mountain Bike?
It’s time to change your cassette when it’s time to change your chain. And it’s time to change your chain when it’s time to change your cassette. The two components function completely in tandem, so they evolve together through the hours of mountain bike rides. Any of the following symptoms MAY indicate it’s time to replace your cassette cogs (and your chain):

- A stretched-out chain (was once taut and responsive but now flops or frequently comes off the gear rings.)
- When pedaling, the chain skips links or gets stuck in rigid links.
- Rounded teeth on your cassette cogs (you might notice this with visual inspection, or you might notice that chain links slip on the cog teeth when pedaling)
- You can also use a chain measurement tool or a cog-wear indicator gauge (don’t we all have one of those in our junk drawer?) to measure.
- A crash that bends either the chain or cassette cogs.

Do you always have to replace the cassette when you replace the chain? Well, noooooo, not always.
If you consistently replace your chain when it’s worn – before riding enough to cause wear on the cog teeth – you can probably replace the chain only. If all the cog teeth are symmetrically sharp (not like shark teeth), with no tips broken or other damage, you can replace the chain only.
If the cog teeth are rounded, chipped, worn unevenly or you’ve been riding a very long time on a worn-out chain, you really have no choice but to replace the cassette at the same time you replace the chain.
You never want to replace a cog cassette and keep riding with a worn-out chain. An old chain will rapidly wear down the teeth of new cassette, rendering the replacement as worn as the old cassette in short order. For very in-depth information on information on how to measure chain wear, I recommend this article, How to Know When it’s Time to Replace Your Bicycle Chain.
Are you looking to learn more about wheels and axles? Related articles on DIY Mountain Bike
- What is a Thru Axle vs a Quick Release (QR) an in-depth article stepping through the differences and benefits.
- How to Assemble a MTB Wheel, when a bent or cracked wheel needs to be replaced, find out how.
- How to Adapt a Non Boost Wheel to a Boost Frame or Fork, Sometimes your wheel and frame aren’t aligned.

Professional writer Kat Jahnigen was 2 miles from the nearest village – and roughly 2,310 miles – from the nearest English-speaking town – when her bike tire burst. At that time, she was a college student on a bike trip across the desolate, rocky island of Crete. It suddenly occurred to her that it would’ve been good to learn some basic bike repairs before setting off on a solo bike trip.
Check out Kat’s website WriteHire at writehire.net.